
Owner
Karl V
Location
Surrey, UK
Project
Everyday/touring Nomad
Why?
After my Atom 2 ownership, I was looking for a more ‘everyday’ car that would give me Ariel performance with touring practicality. SPOILER ALERT – there is nothing technical in this post; just a collection of low-tech mods designed to make the car more ‘usable’ come rain or shine.
Shopping list
Luggage space for touring
Mud flaps
Sun visor
Cup holder
Fabric roof
Fuse box protection
Quick release side panels
A bit of ‘waterproofing’ in high drip areas
Starting point
I set out wanting to enjoy the car. That largely meant being prepared for any eventuality, be it a quick run to the shops, a 3-hour hoon across mud and B roads or a tour far and wide. I wanted to embrace and learn from whatever was thrown my way. As such, most of the mods were applied from experience. Except the first one, that was a known ‘must have’ in advance of collecting the Nomad.
Luggage space for touring
Before taking delivery of the car, I already knew that I wanted some form of lockable storage. It had to be waterproof of course and ideally large enough to fit the removable steering wheel. I focussed on the spare wheel carrier as a place to substitute the spare wheel for a motorbike top case. After speaking with the factory, I settled for the spare wheel carrier minus the centre spindle that holds the wheel in place.
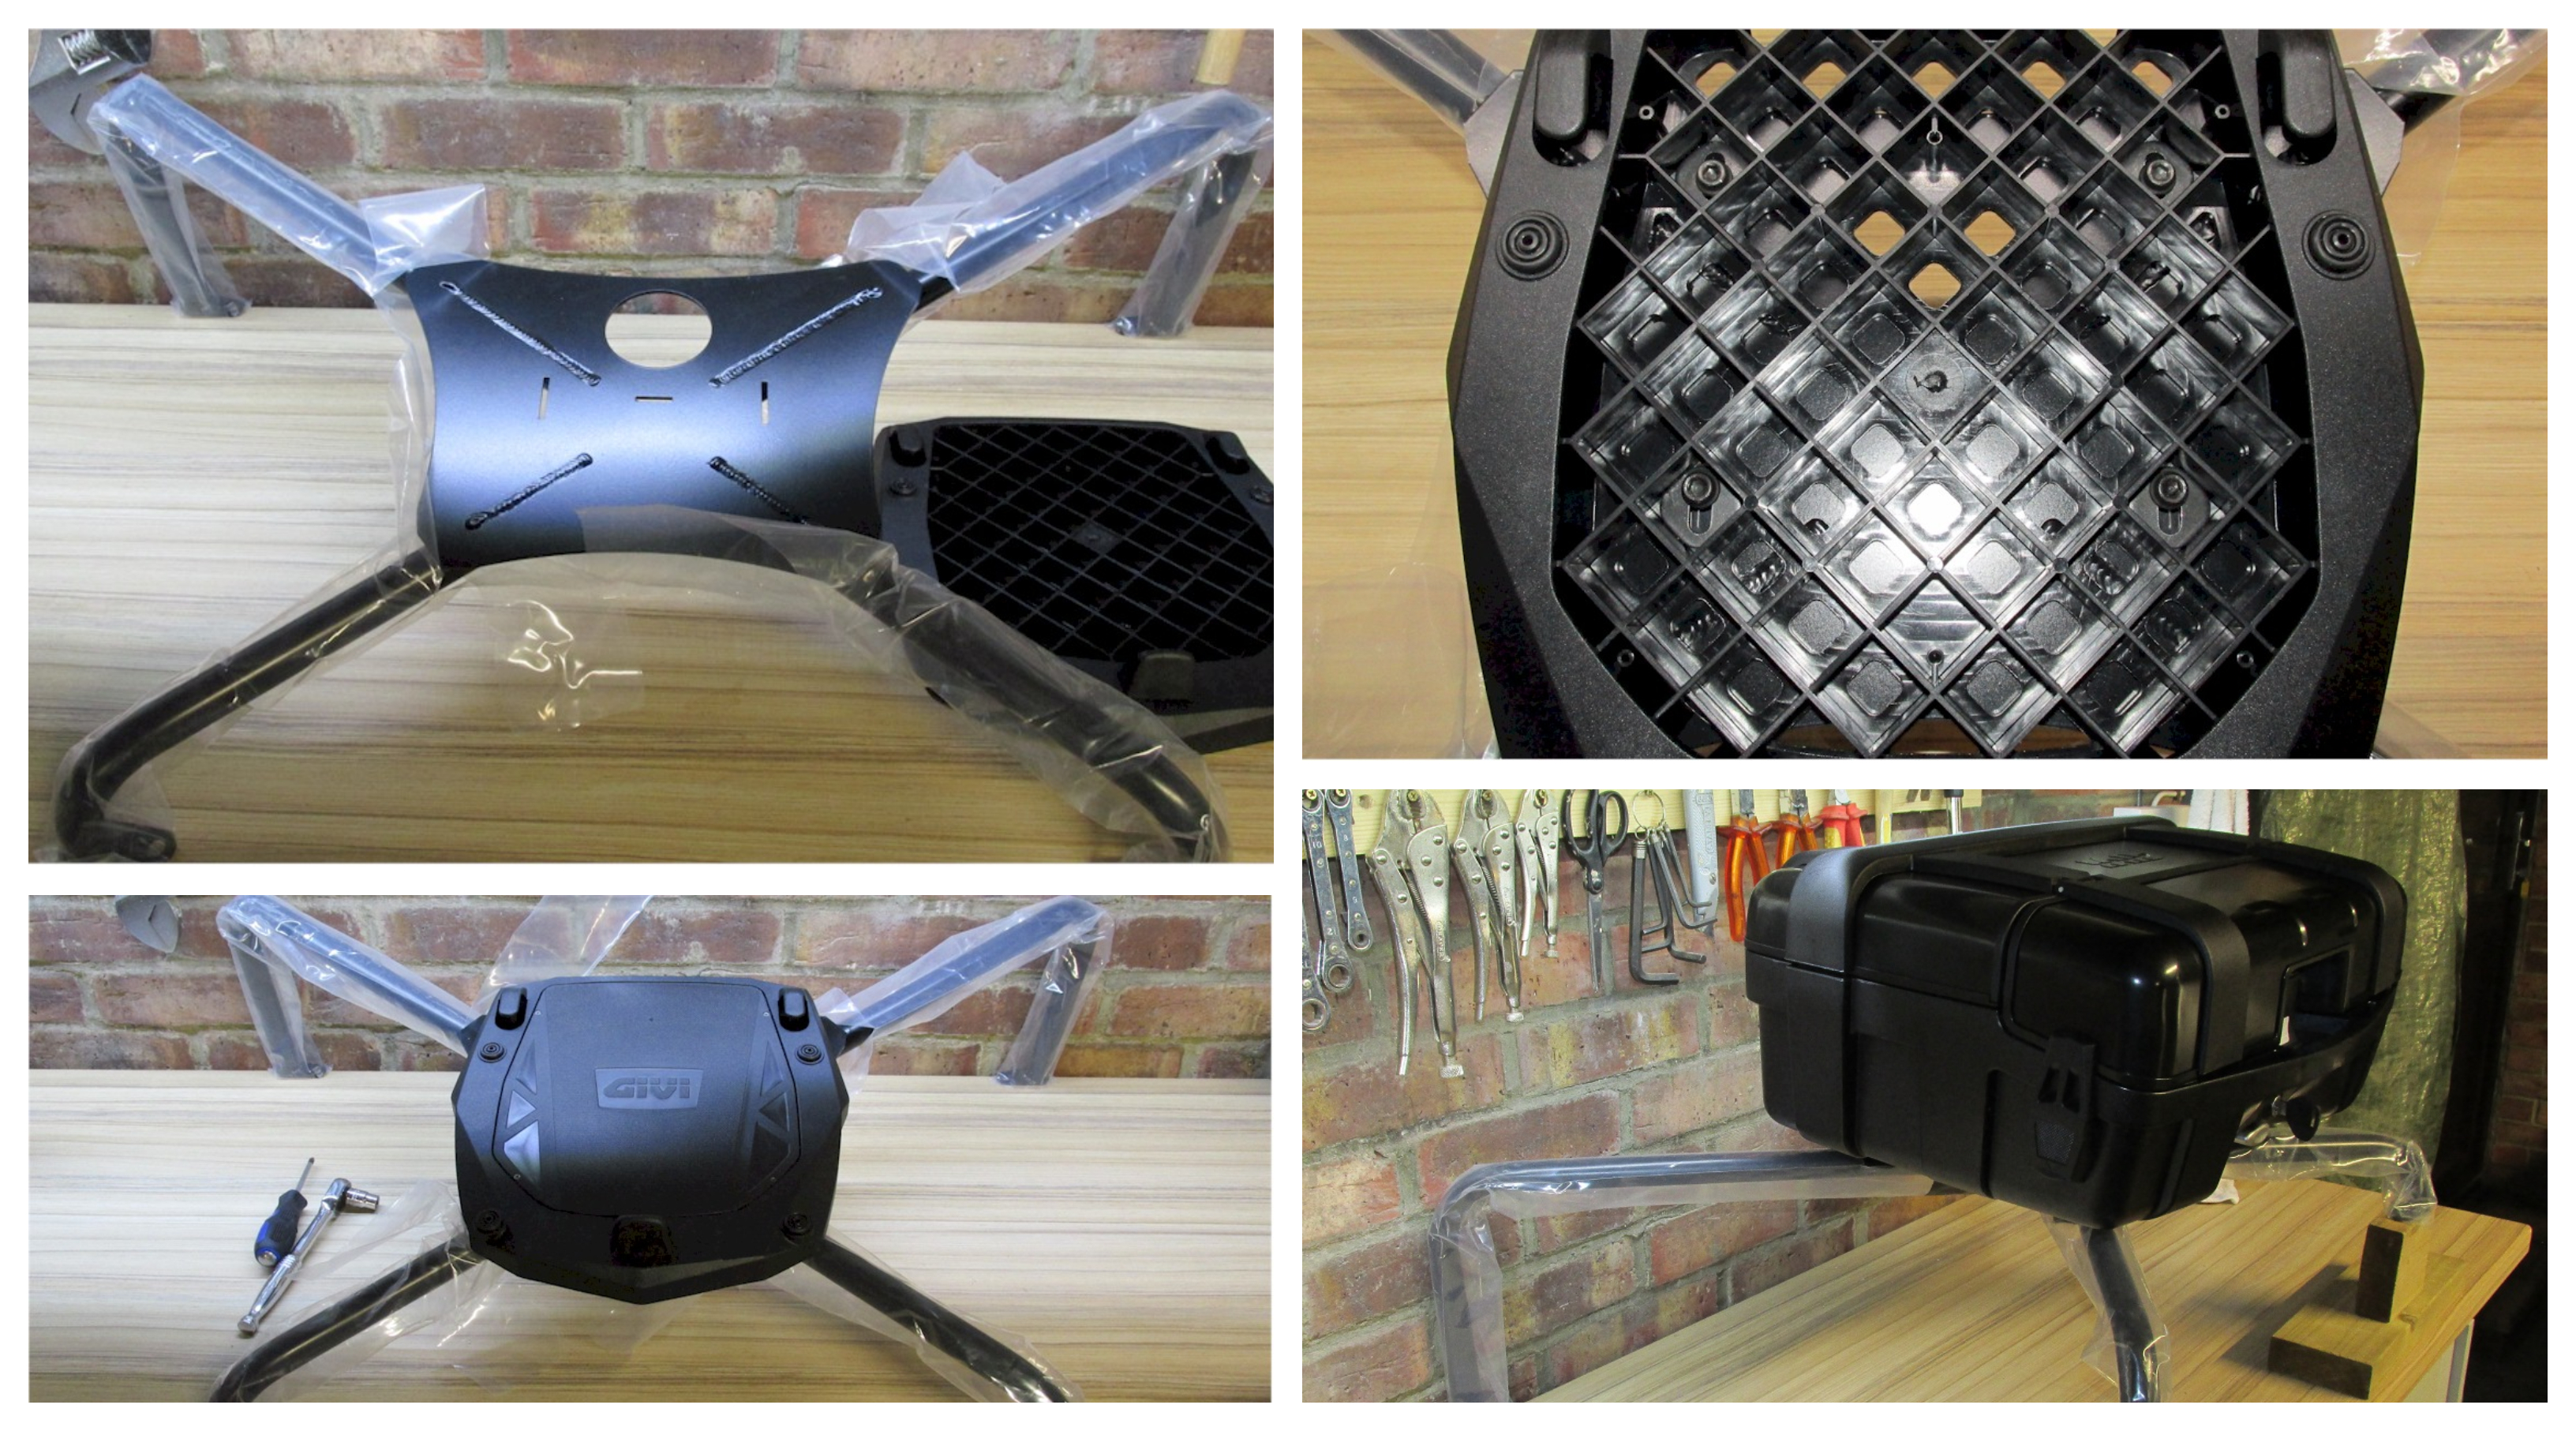
The result is a nicely angled plate that allowed me to bolt on a Givi E251 universal Monokey mounting plate, that would eventually hold the Givi Trekker Monokey TRK33N top case.
I wanted a box that wasn’t too tall that it sat proud of the roofline. As I was building the mod blind (before the car arrived), I happened to get lucky.
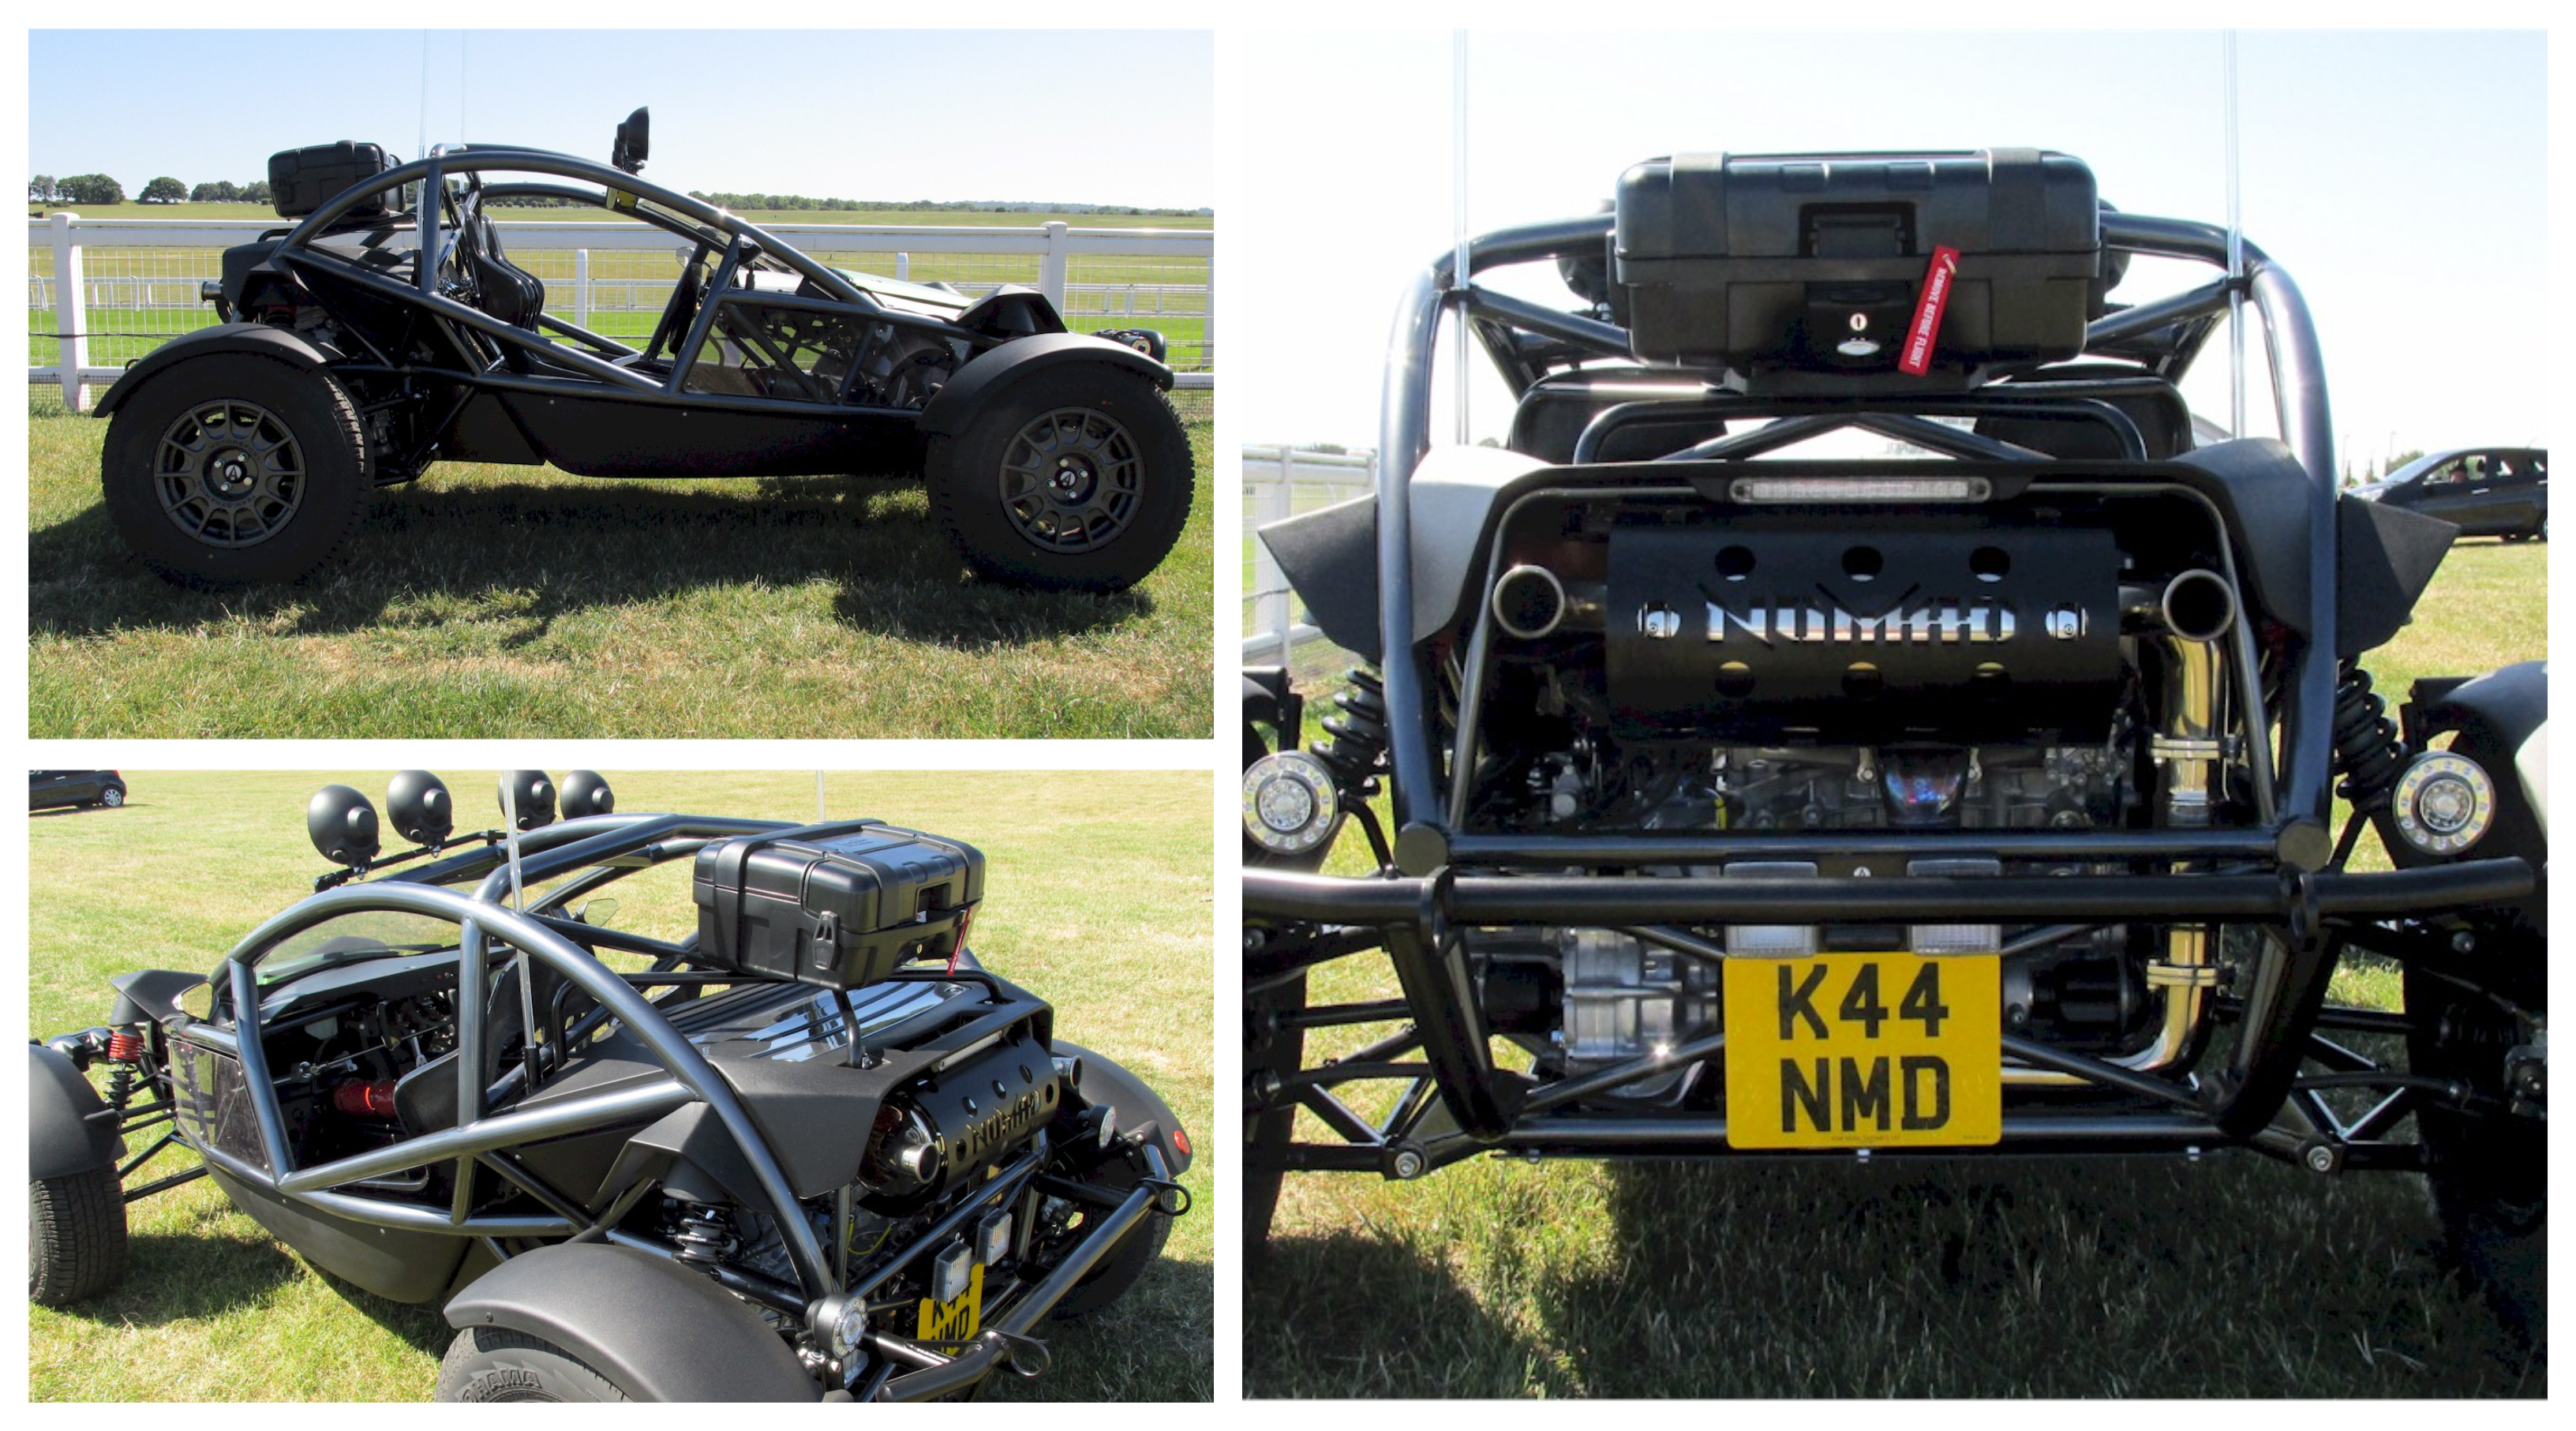
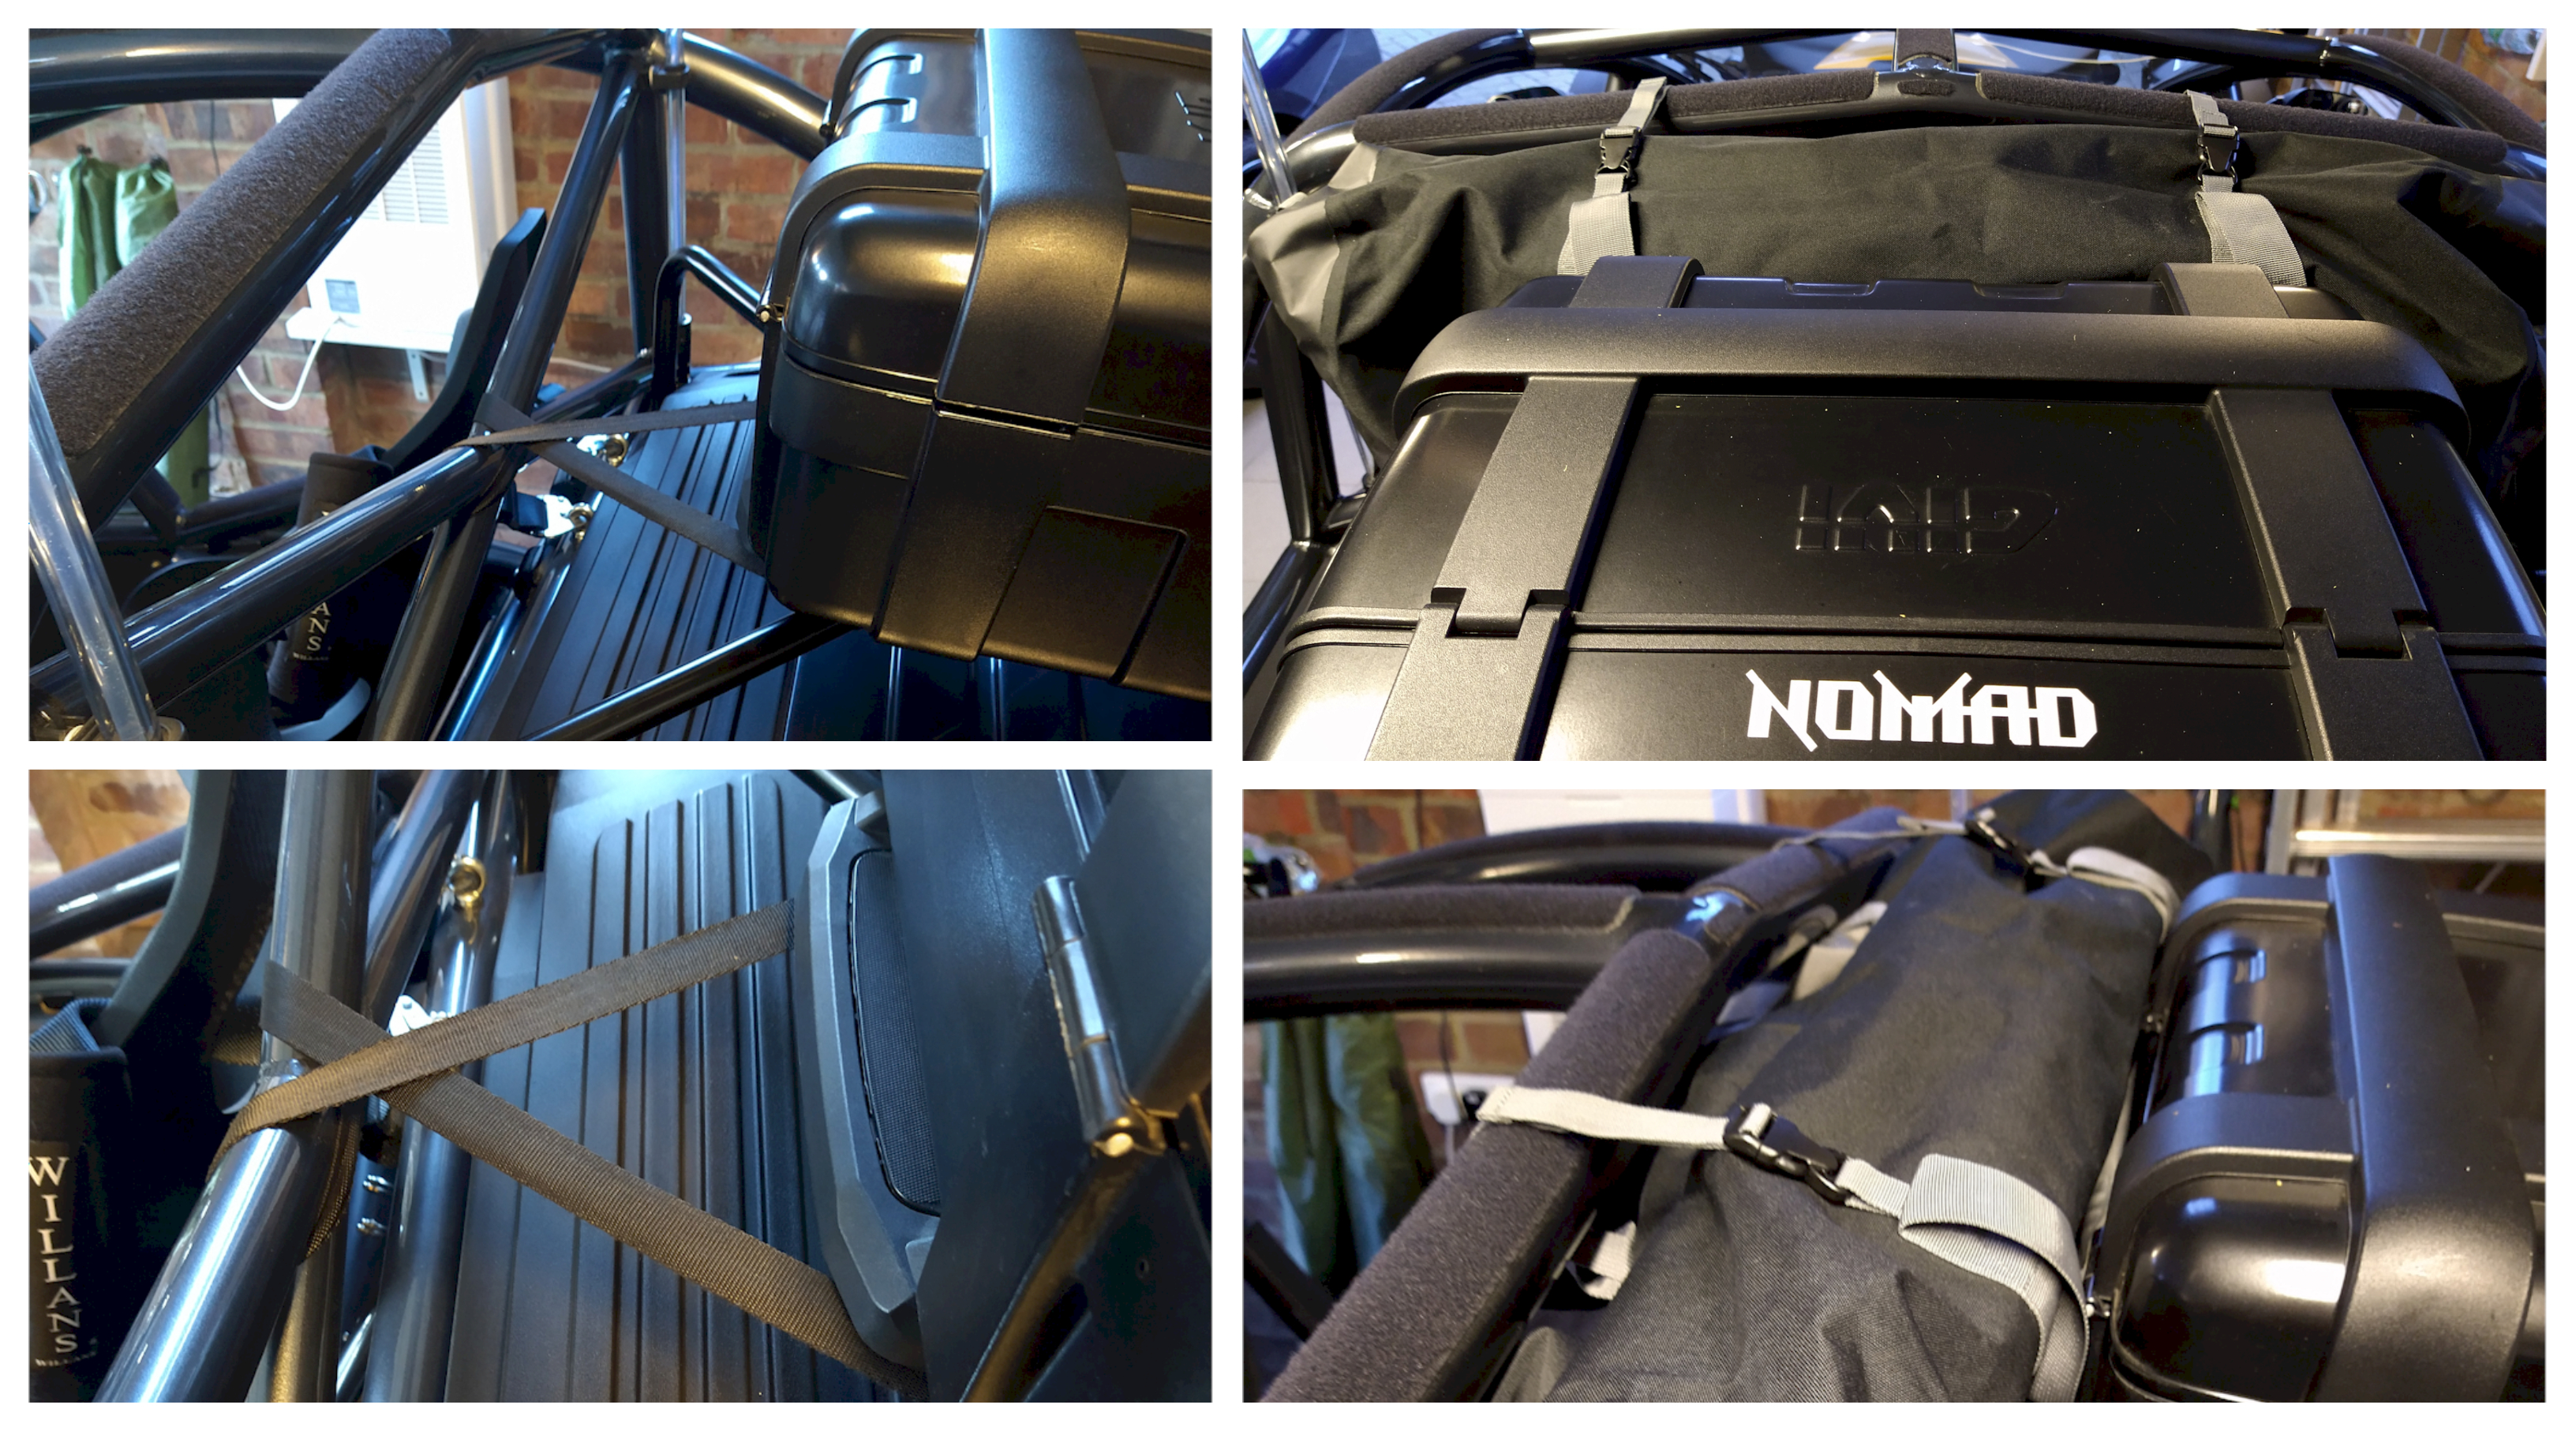
When the car finally arrived, I then took advantage of the (unintentional) gap between permanent box and rear frame to weave a lashing strap to form a base between the spare wheel carrier legs. This houses a 60L dry bag very nicely for those longer trips.
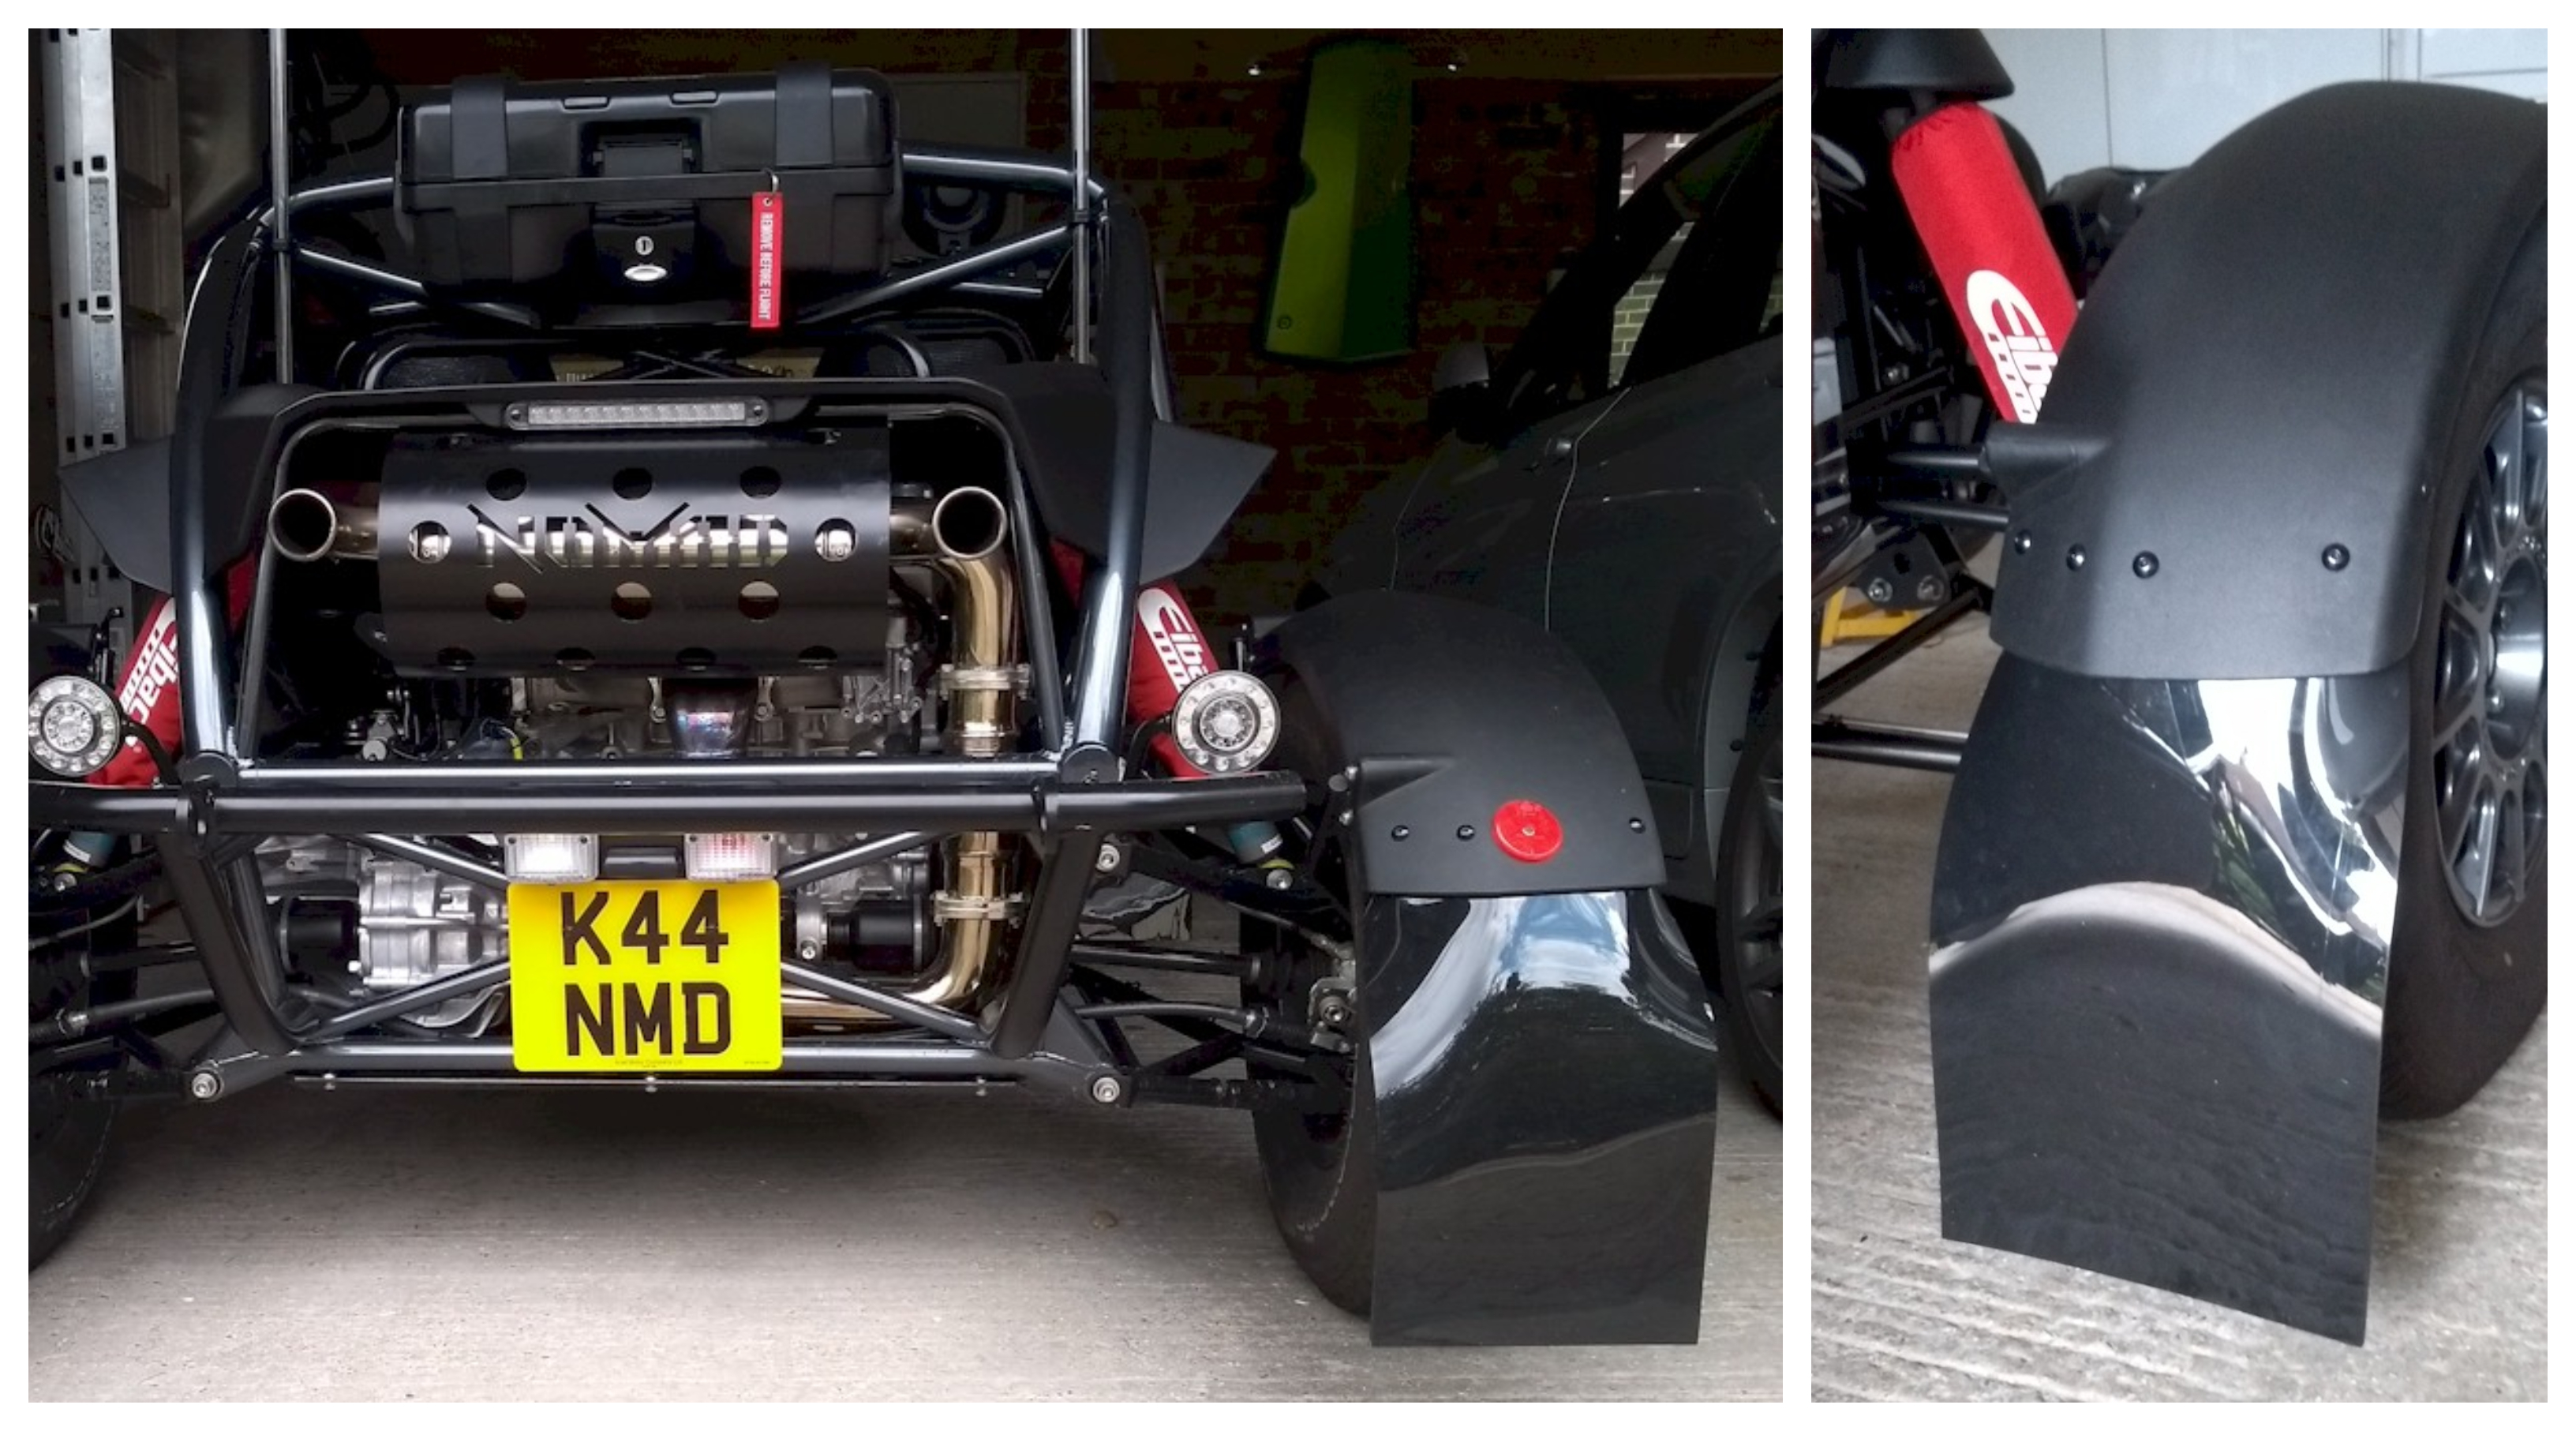
Mud flaps
I had read a few forum posts about how mud and rain is sprayed into the cabin when turning the front wheels and was inspired by early launch/testing footage showing a Nomad tearing it up through a dirt track with…mud flaps.
I grabbed some black 4mm generic rally style flaps and set about looking how to attach them to the mud guards. I quickly realised that having fairly heavy mud flaps (plus the drag they create at speed) would cause issues at the front, where the mudguards are much more ‘flexible’ (the rears have an extra internal brace underneath to stiffen them up). The design of the mudguards and mounting brackets for front and rear are identical, except for the extra braces at the rear, so I grabbed four of the braces from Ariel (two for each front wheel) which gave the rigidity needed to hang a bit of extra weight.
Next up was to mark out the mounting holes. I wanted to follow the existing V shape of the mudguards to give a bit more stiffness to stop the flaps flying horizontal at speed. I measured and marked the holes, using metal fixing brackets underneath.
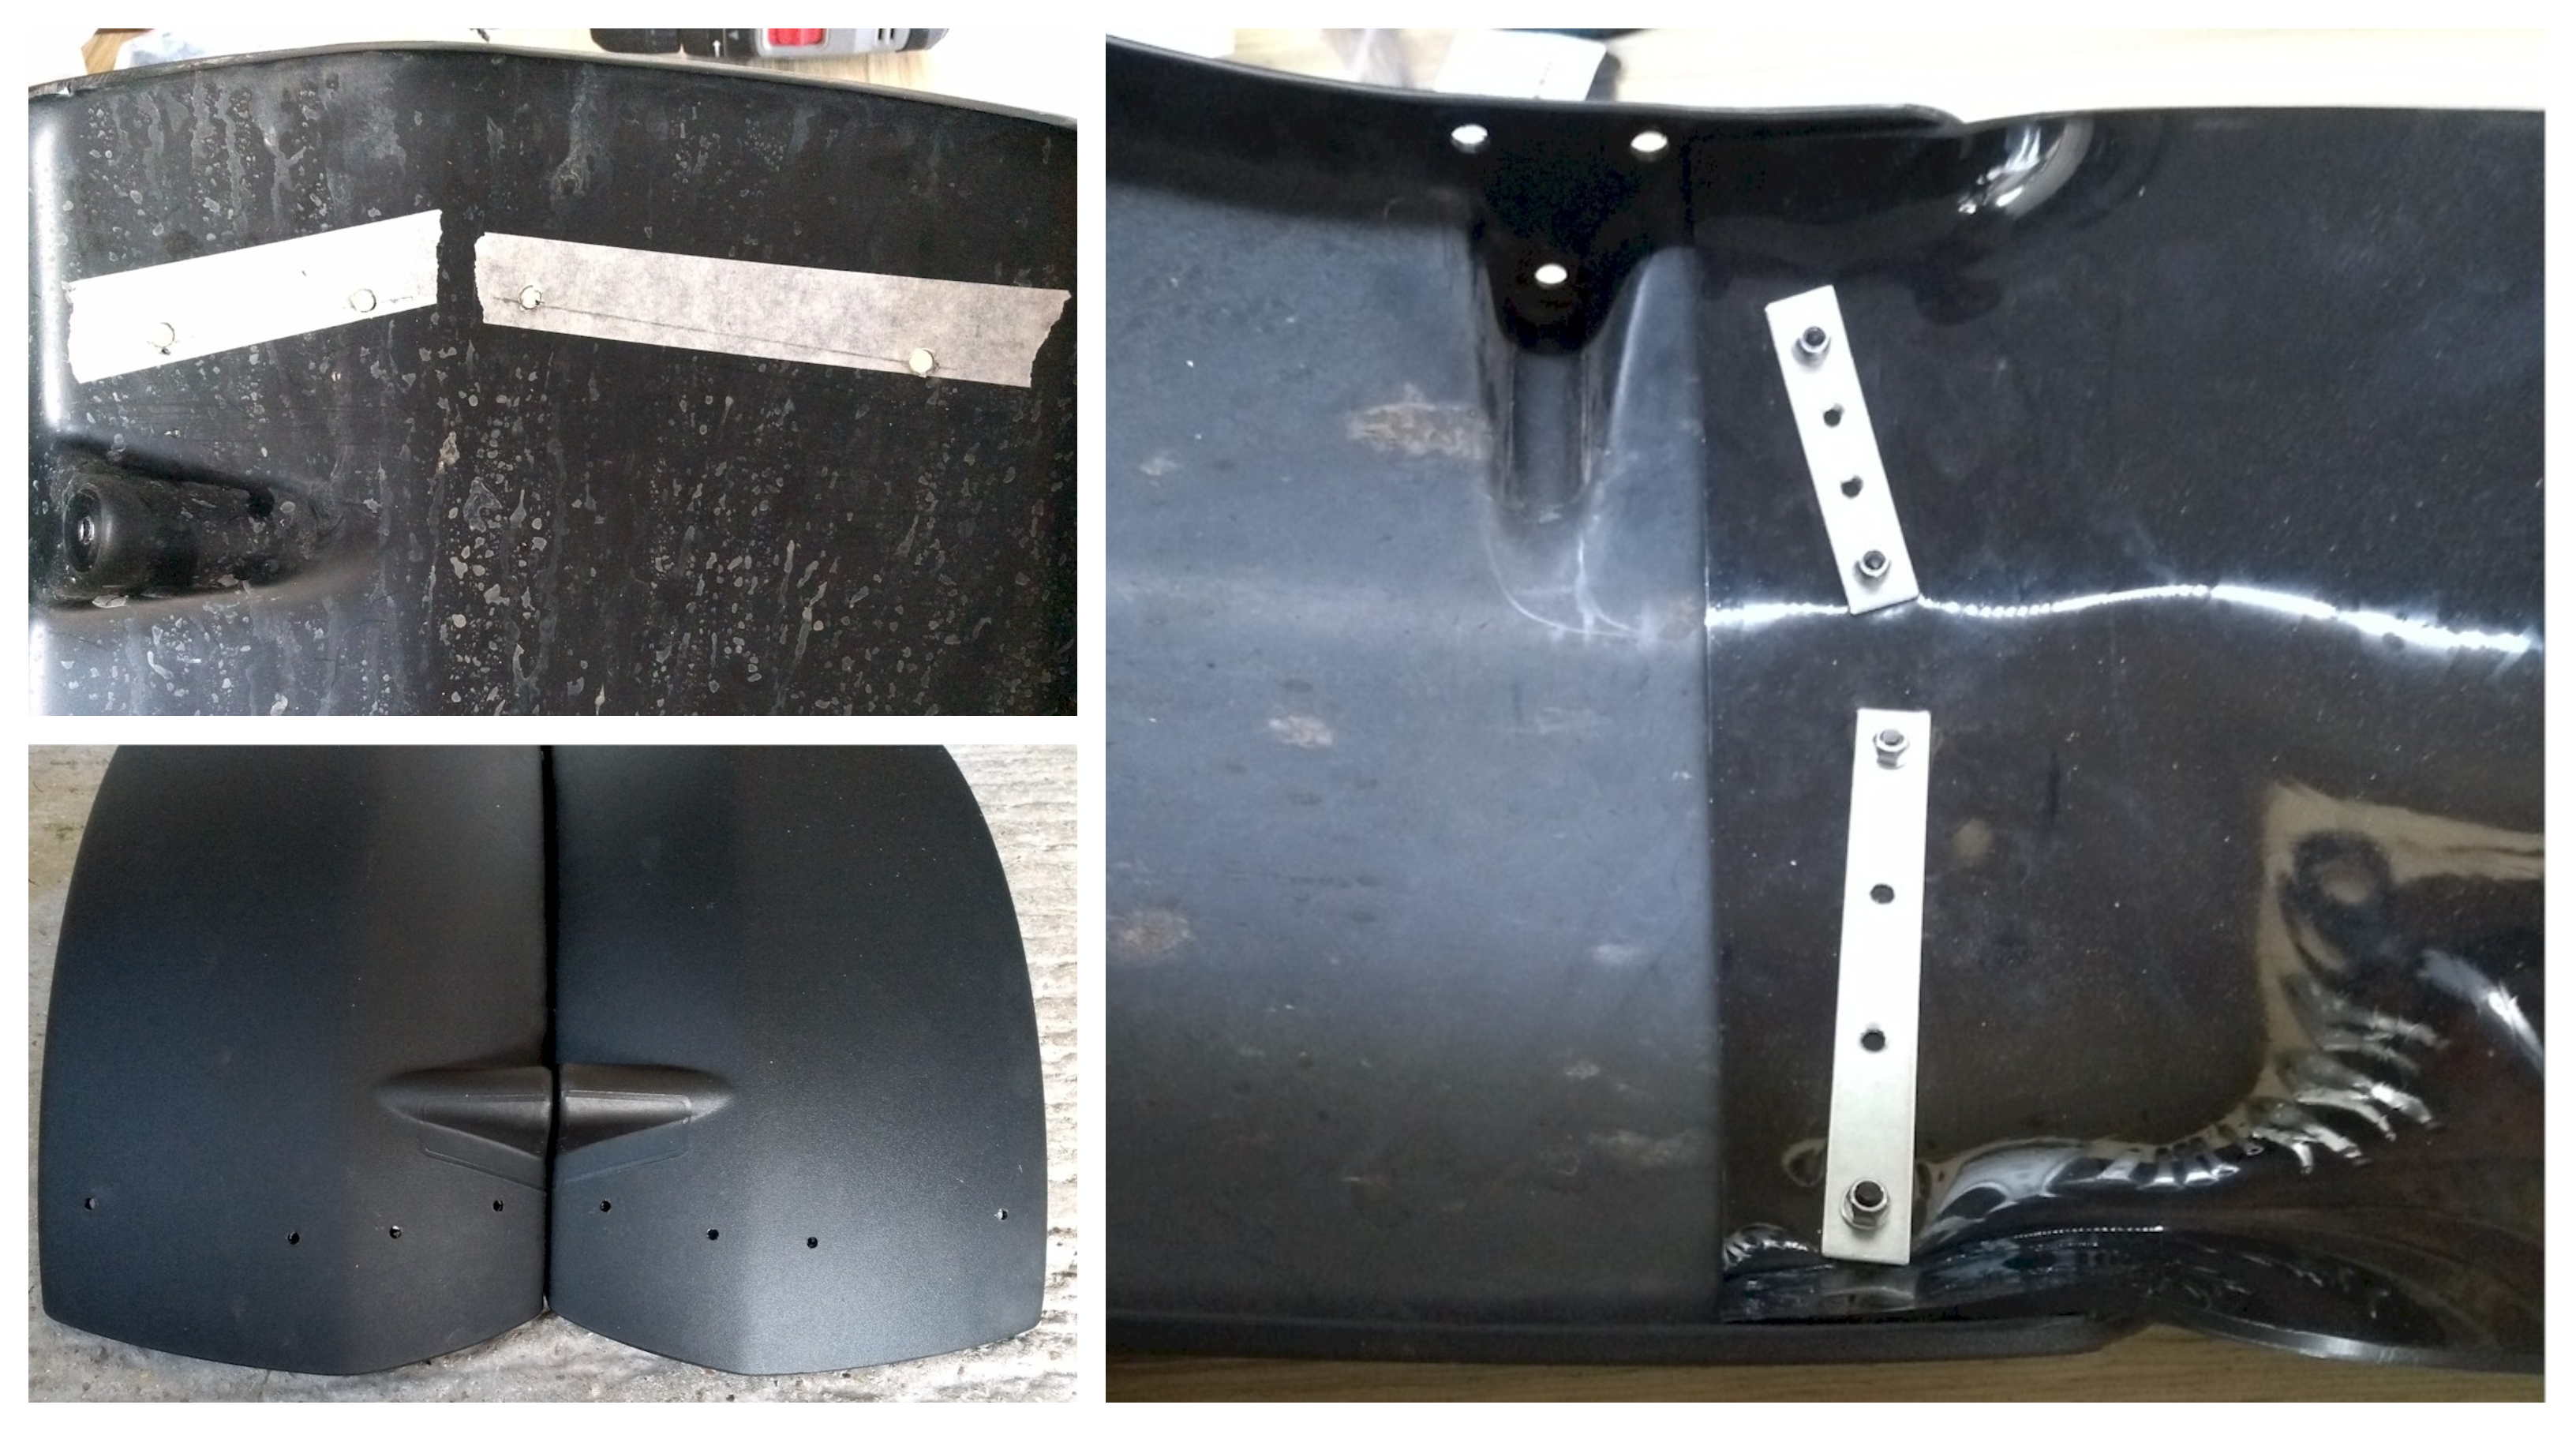
At the rear, I worked around the existing hole for the rear reflector.
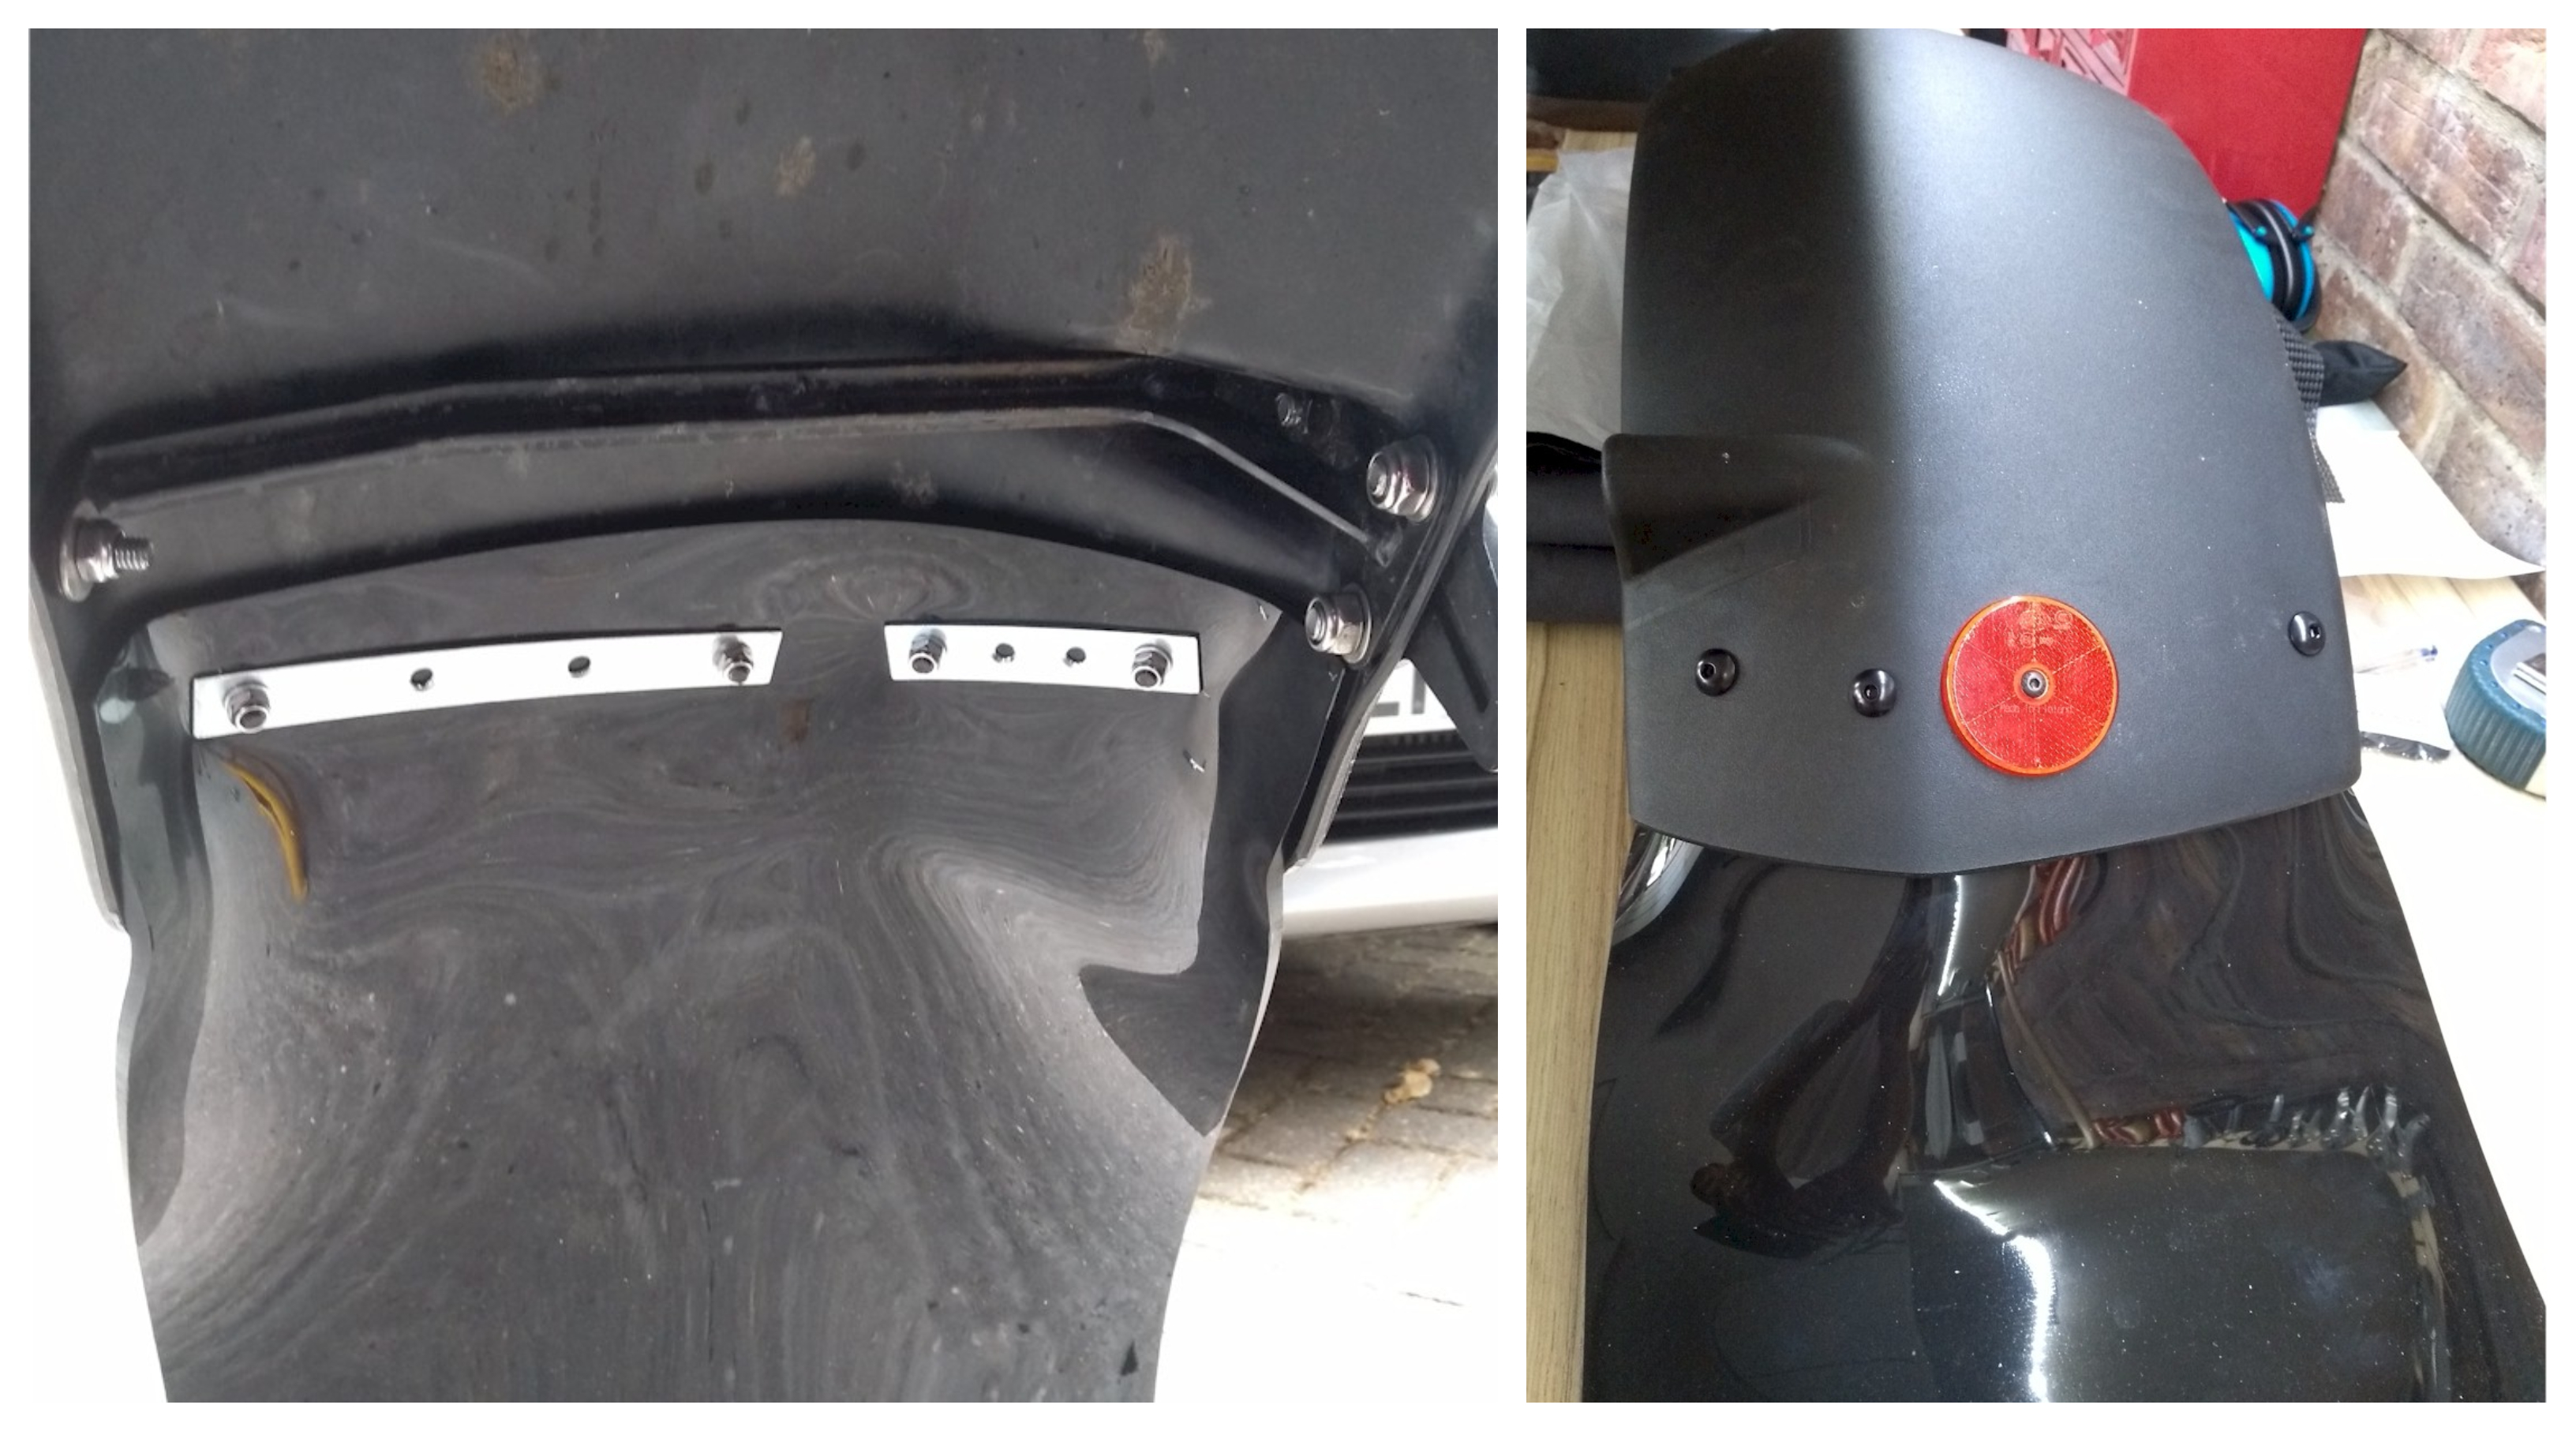
They seem to do the job and don’t hit the tub at full lock. At 60mph, only the last two or three inches of the 16-inch flap bends out to about 30 degrees or so, so I’m pleased that the shaping of them has created the extra vertical stiffness.
Sun visor
Picture the scene — you are hitting the B roads early morning or late evening and the huge Nomad windscreen is keeping the bugs from hitting your teeth, as you grin your way to the next T-junction. The problem is, the sun is low and you can’t see much. With or without sunglasses, the low sun and lack of sun visor means you end up closing your eyes and ‘just going for it’. I’m sure you’ve been there.
And the windscreen is huge. And – like all windscreens – it shows up the smears that you swear weren’t there before you set out for a hoon.
To combat the lack of flip down sun visors, I went for a strip of matt black car wrapping material on the inside of the windscreen.
It is matt on the inside but looks gloss from the outside because of the glass. It’s only about 5″ deep but is enough to replicate what a sun visor does in low sun.
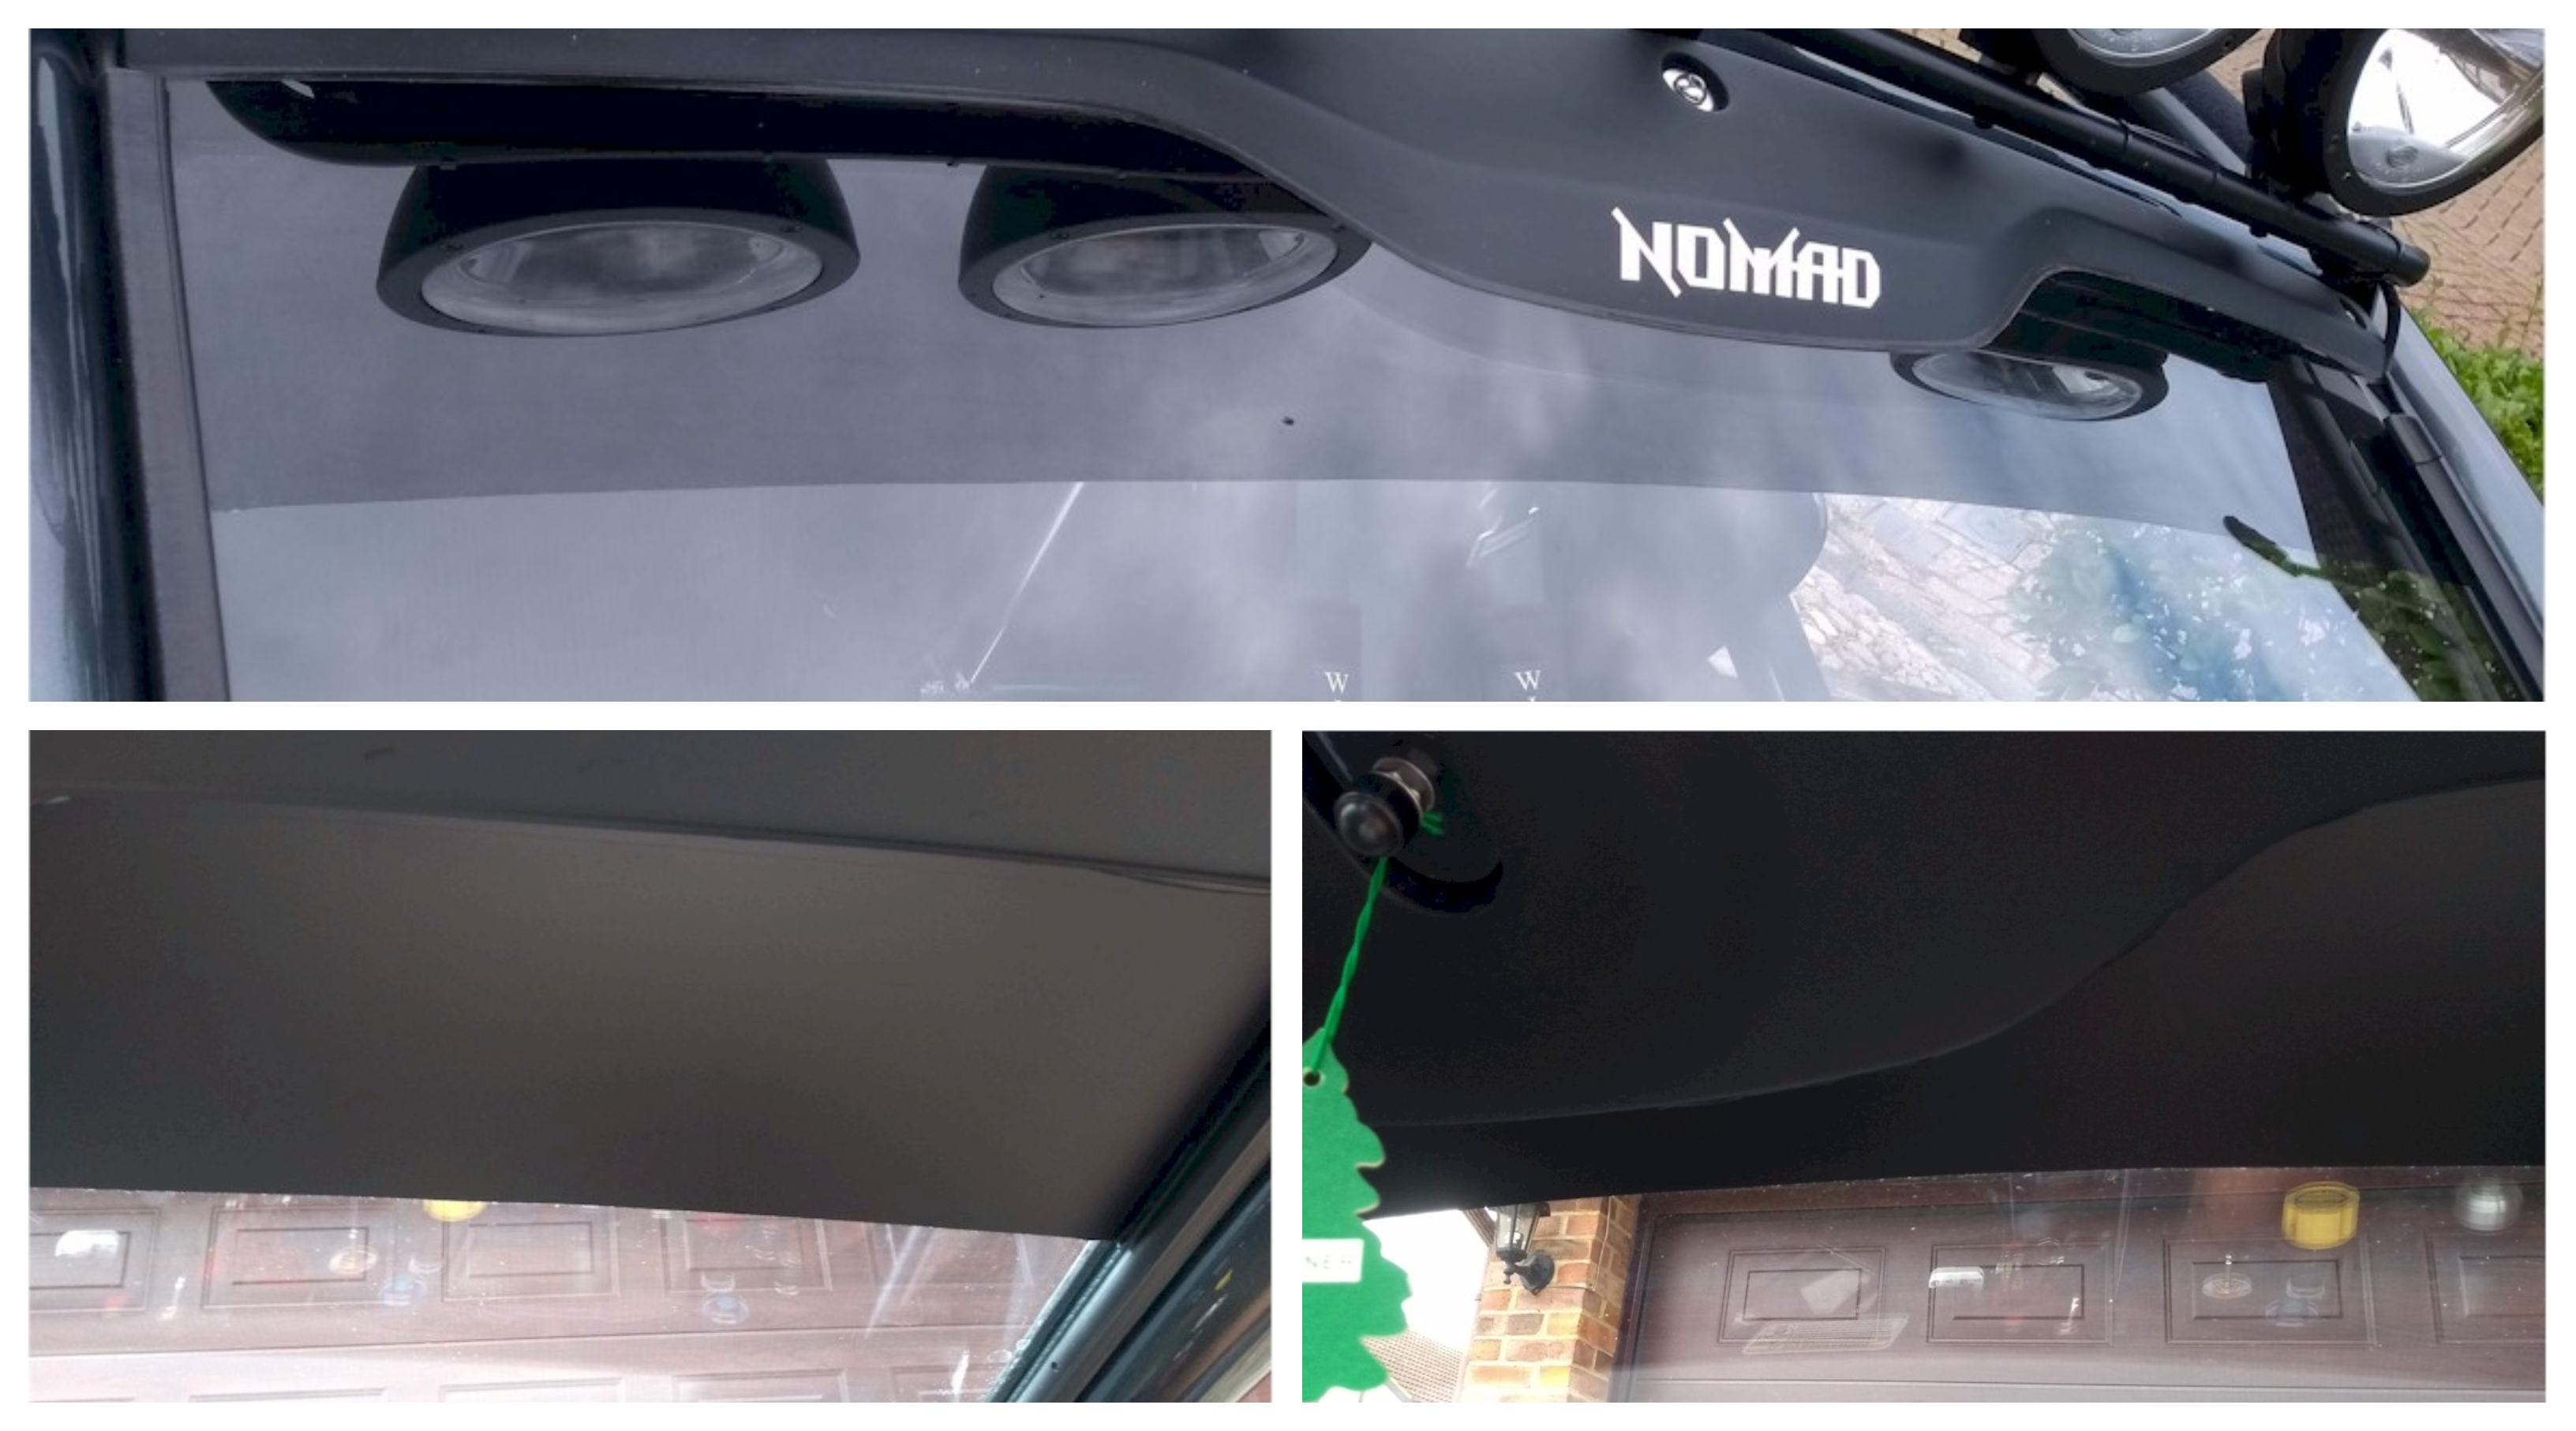
Also…it is well-documented that when those four roof spotlights are on full beam, the glare from inside does little more than light up the dirty windscreen and pretty much renders you blind. With the black strip across the top of the windscreen, the difference is remarkable. It’s the equivalent of the light output being forced forward and not down.
Cup holder
Once a bragging right of mainstream car manufacturers and a focus of over-engineering in times gone by (I’m looking at you Germany). We’ve been offered pop-out, heated, cooled and even gimbal-enabled cup holders in years gone by. None of that nonsense in an Ariel of course. Which doesn’t help when you get up at 5am to hit the empty roads when not quite awake.
So I found a ‘multi-function’ cup holder but the problem then became finding a vertical or horizontal bar in the Nomad, in the right position, between 2″ and 3″ in diameter, so I had ‘cup holder’ mount fabricated.
The chosen location was just behind the handbrake, using the handbrake cover screws as anchor points. The mount is a horizontal aluminium bracket to sit on top of the handbrake cover (with fluffy side Velcro stuck to it to absorb vibrations), with a vertical 2″ diameter aluminium rod to attach the cup holder to. The rod is screwed in from underneath, then all sprayed matt black, for fun.

Warning: an empty cup at 60mph doesn’t stay in place for very long.
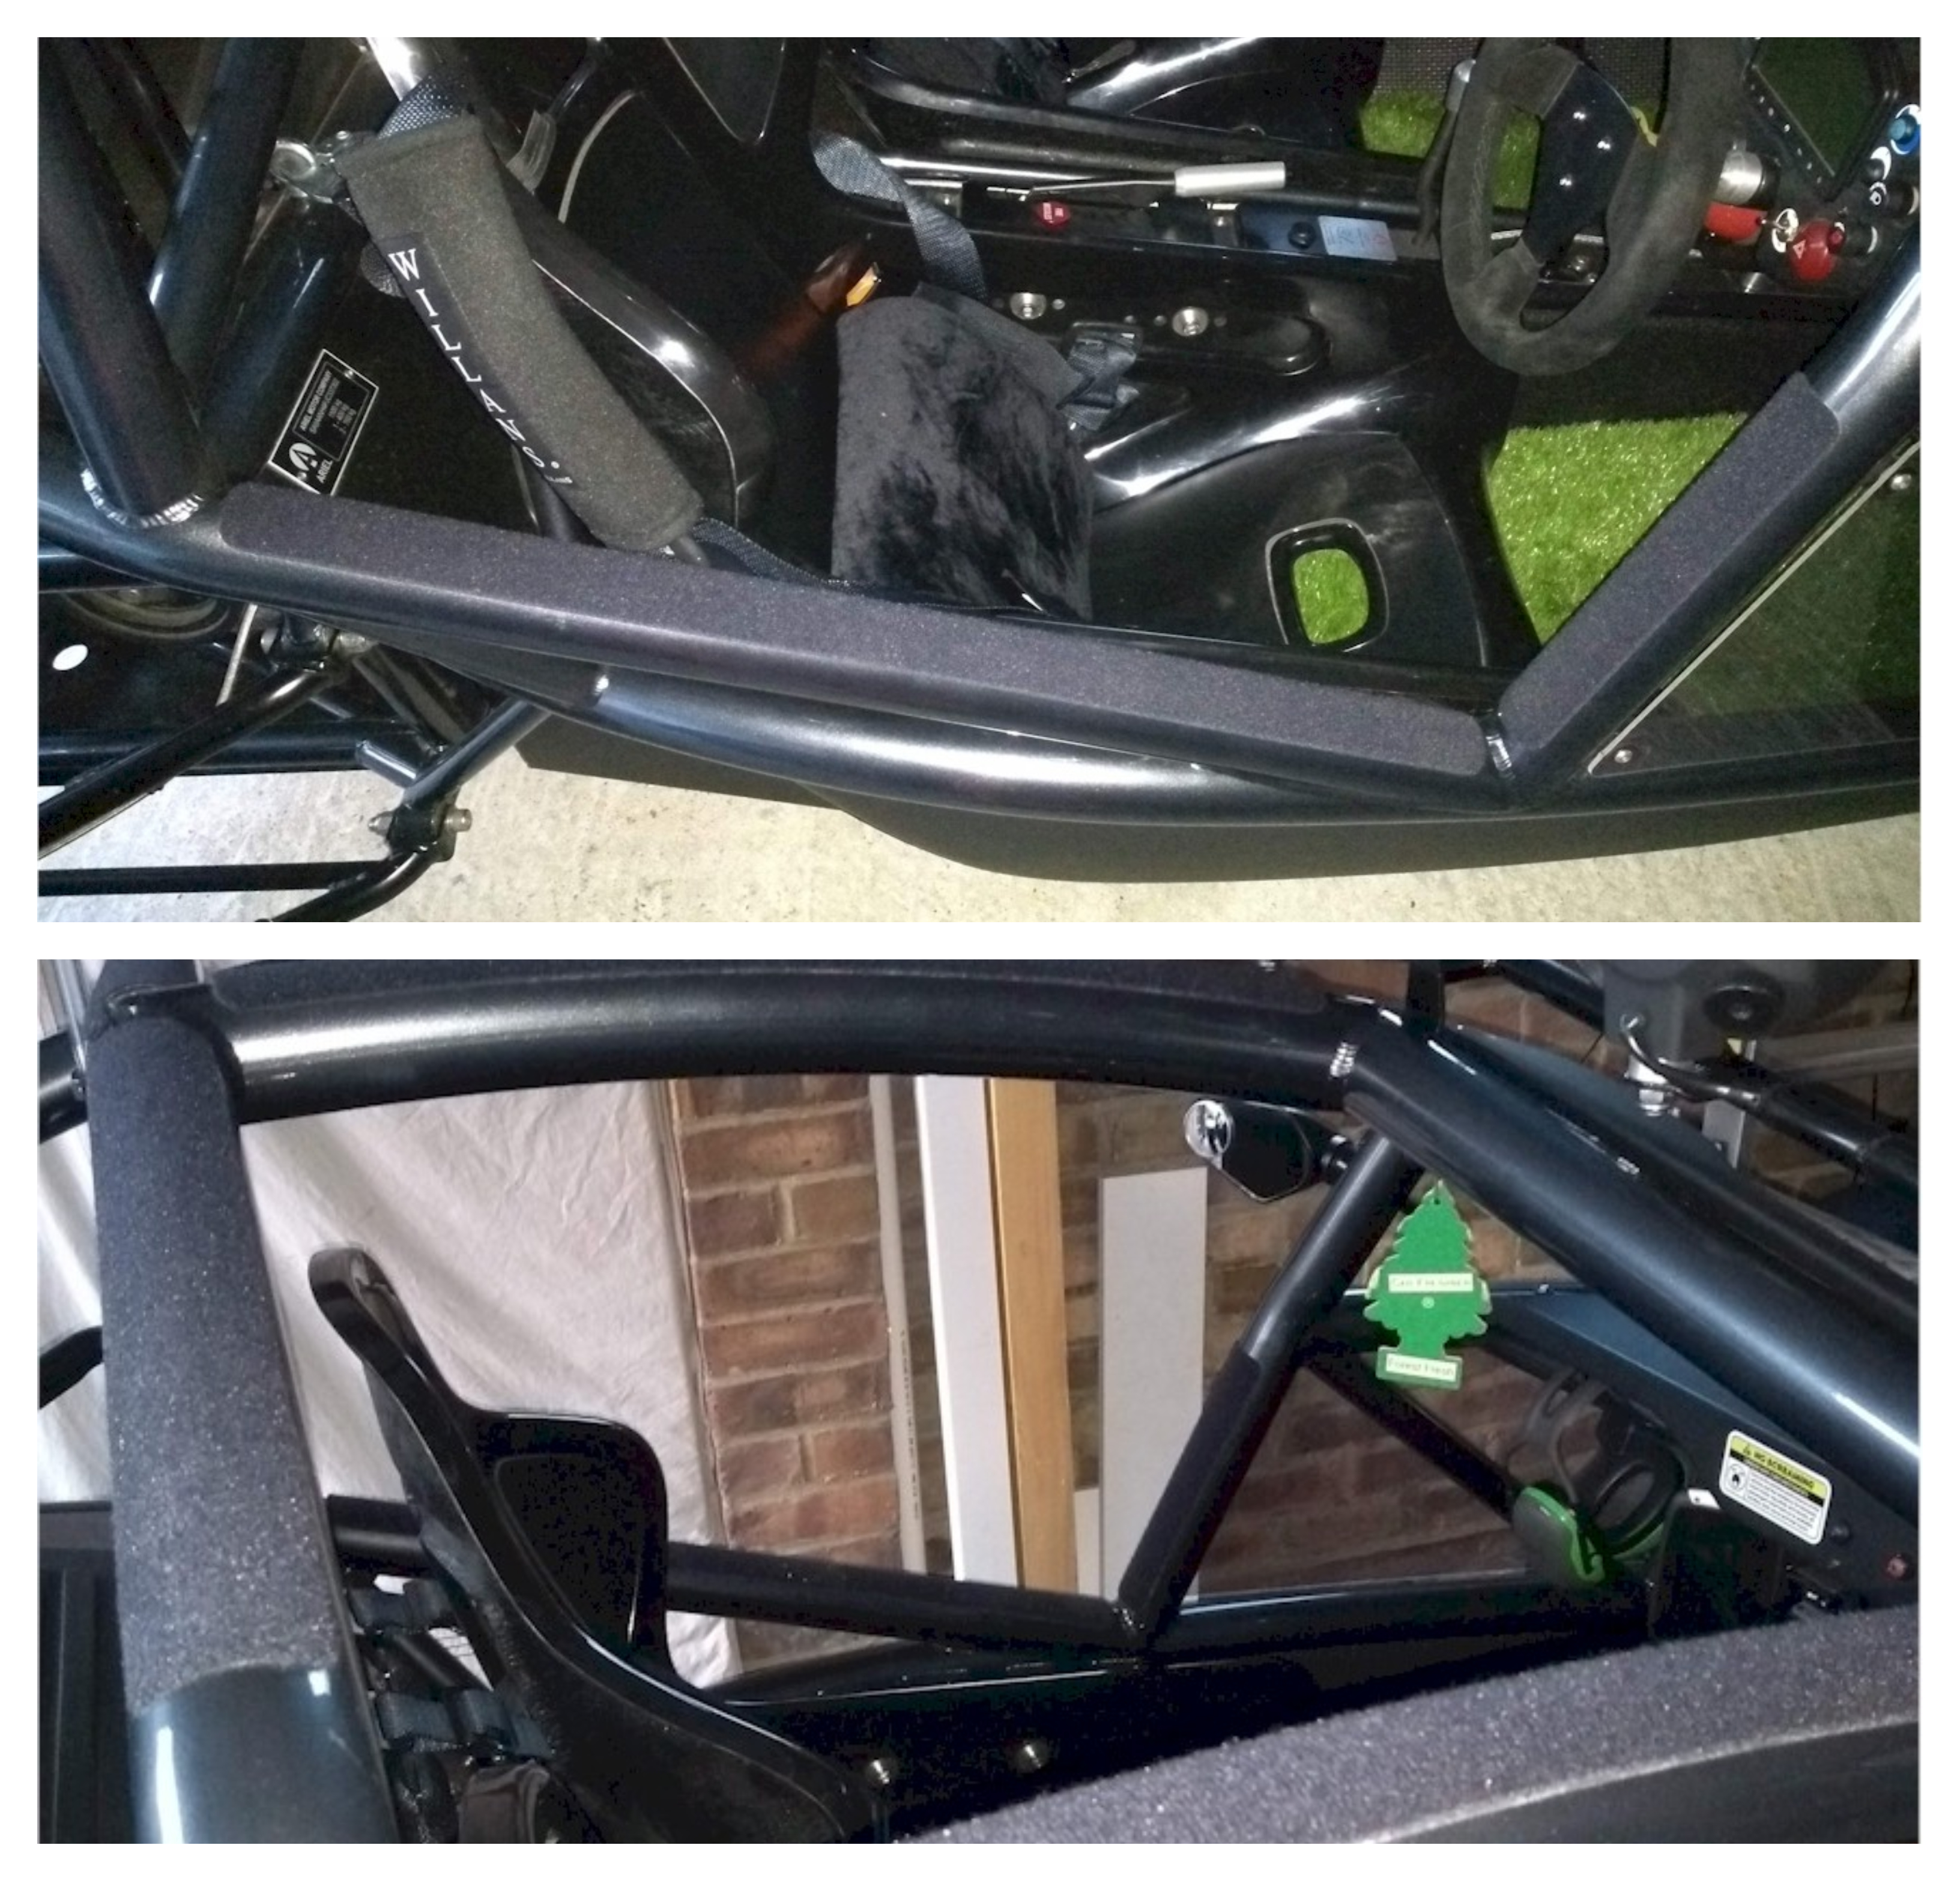
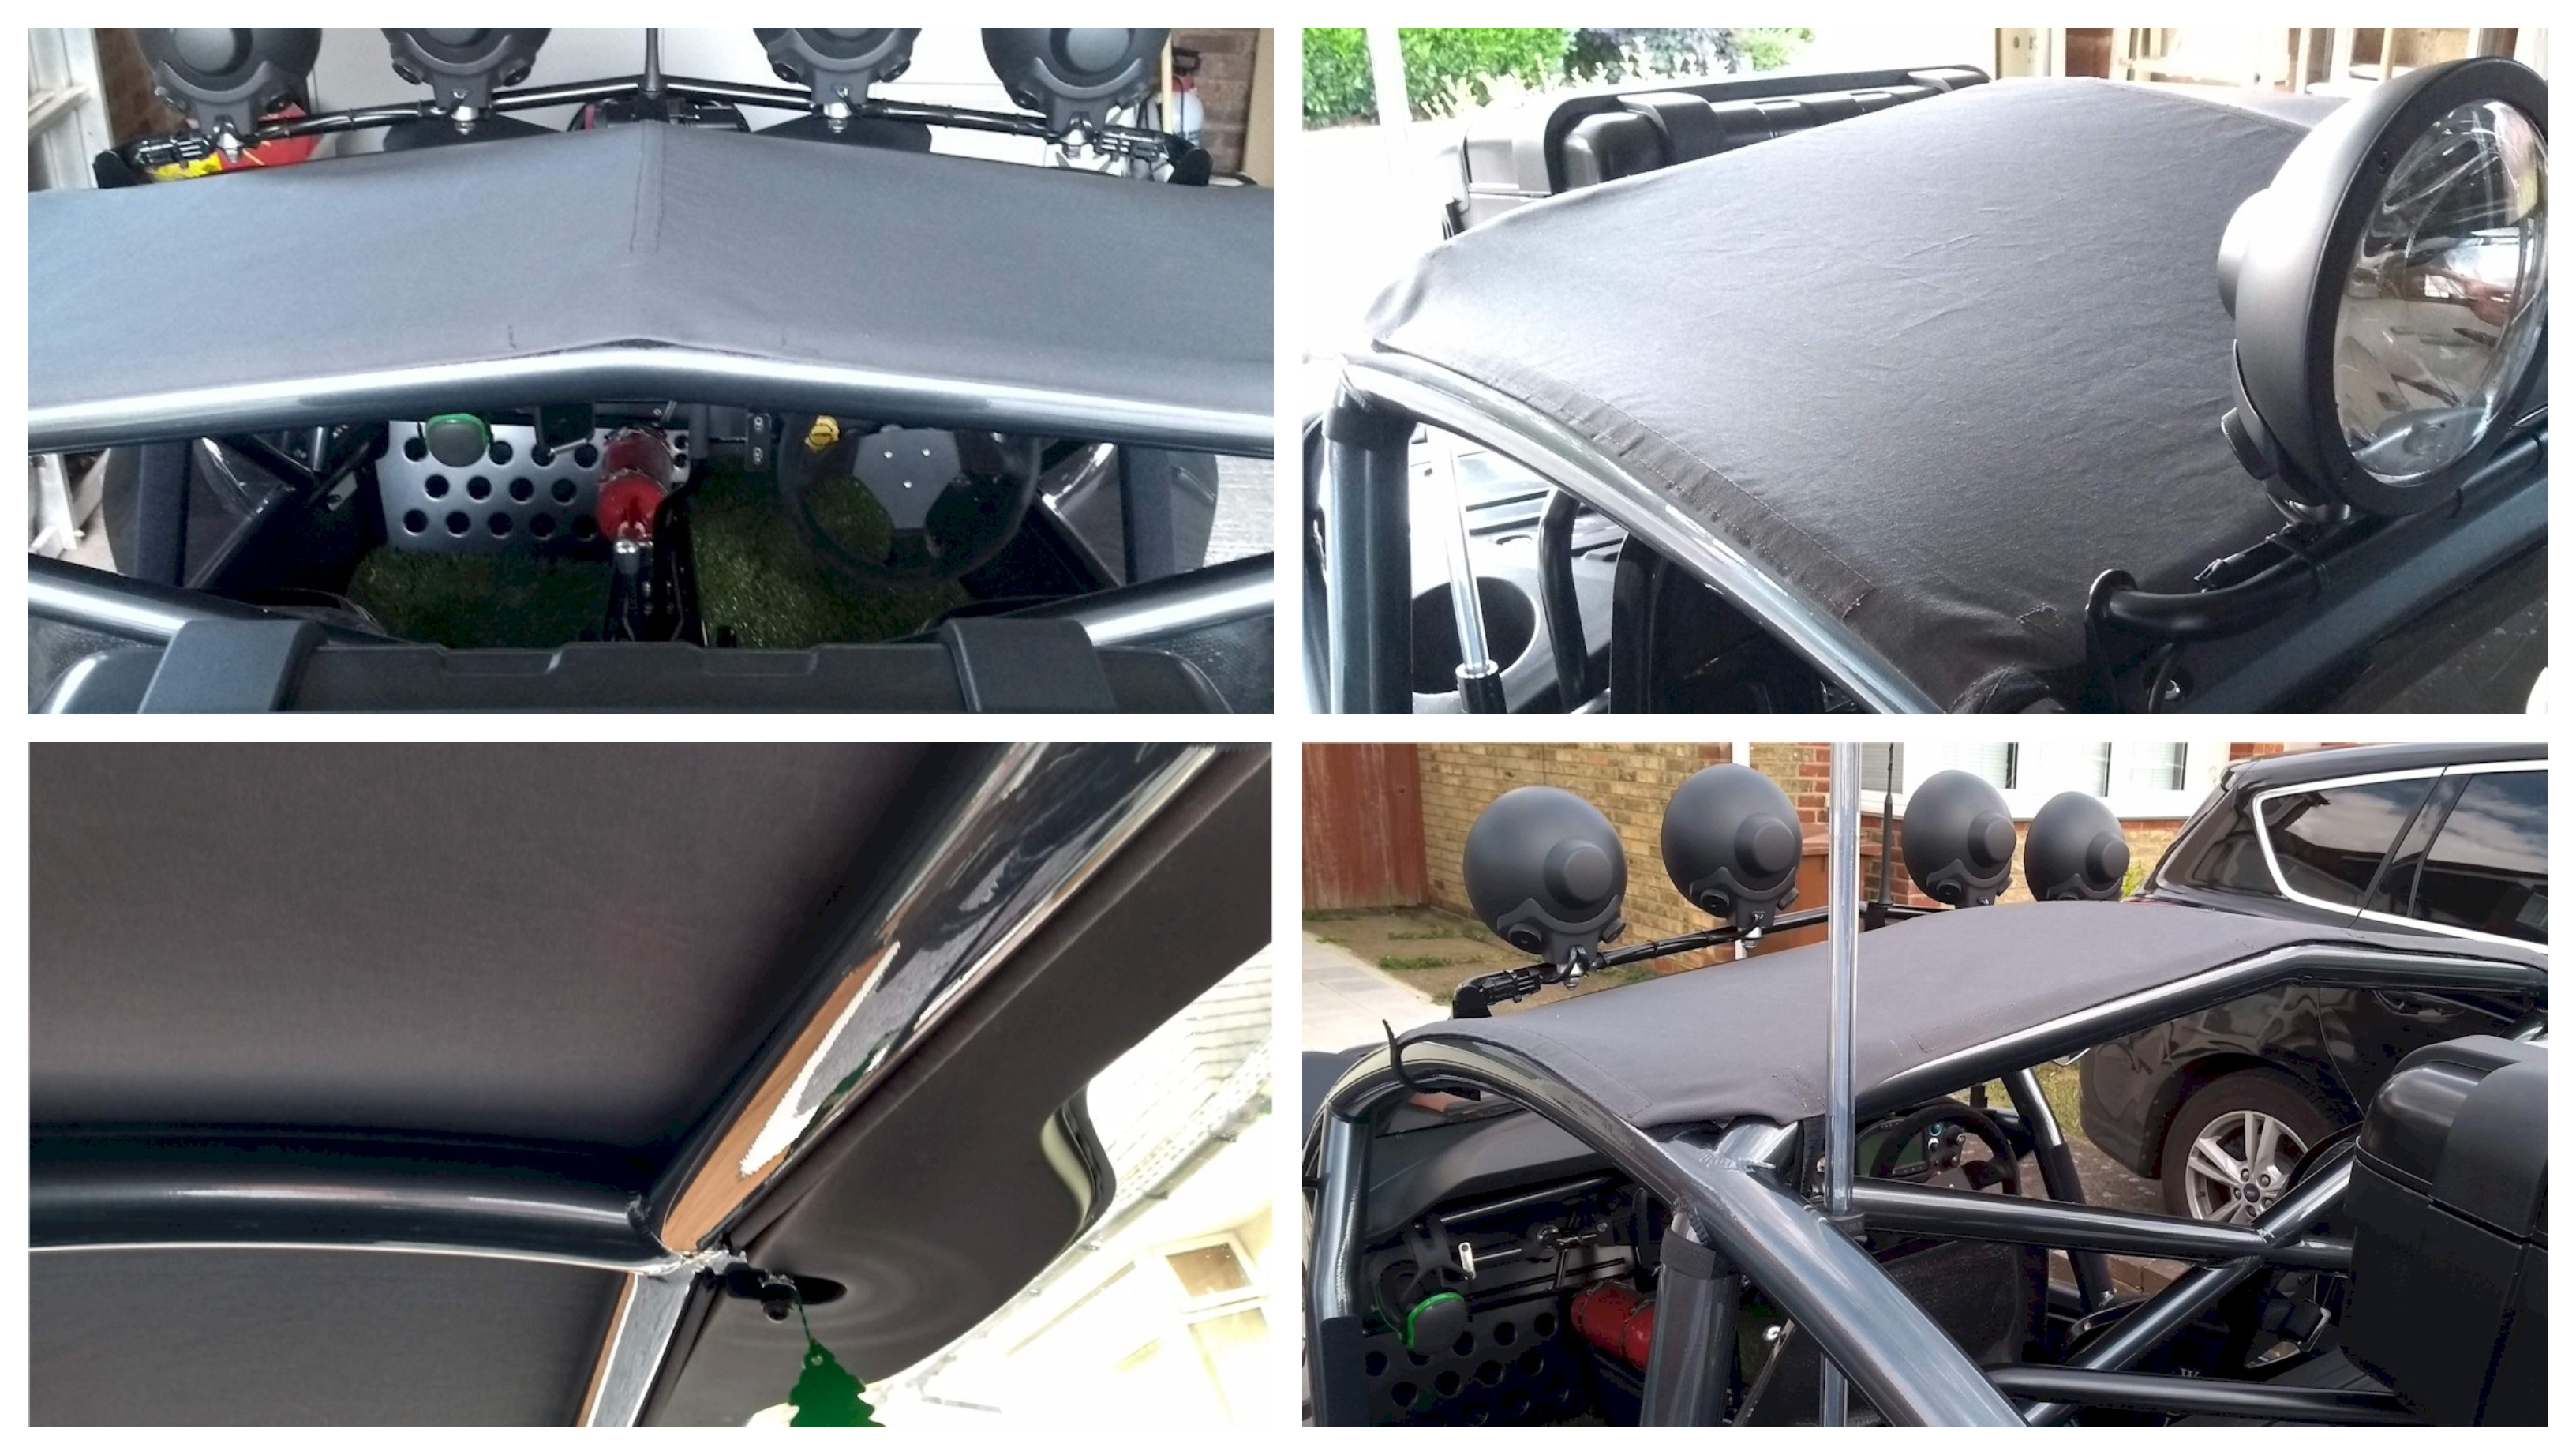
Fabric roof
This was more for the relentless sun as opposed to rain (remember – you can’t waterproof a Nomad!), but it does help in the rain too.
When you pick up a Nomad, there is helicopter tape applied to the two struts where you get in and out. In less than a week, the tape proved its worth as it was scuffed and clearly doing its job. But now the tape looked messy and was clearly just a sacrificial notion. I replaced this tape with the loop side (fluffy side) of Velcro tape as I thought this would be more hard wearing. Then I went on to add the same to the top bars (where you grab when getting in or out) and finally the back of the roof bars for good measure. Bear with me.
This gave me a starting point to mount a roof cover that would be easy to attach and take off, but also provide paintwork protection against rings and overzealous passengers launching themselves inside the car.
Not all sticky Velcro is the same though! There is rubber resin based, rubber block copolymer and water based acrylic polymer. Some is fire retardant, and some is high temperature resistant. That alone wasted four hours of my life and I still have no clue! Maybe you can figure it out.
https://www.hookandloopfasteners.co.uk/fasteners/velcro-brand-adhesives-specifications.pdf
Anyway, I went with the PS-15 excellent tack, rubber block copolymer Velcro (yawn) to safeguard against scratches, and the roof design and construction began.
I used heavy duty polycotton canvas and it’s fixed at the front with fibreglass rods through a channel (like pitching modern tents) and anchored in the four corners with Velcro straps for rigidity. Anti-flapping and tautness is taken care of by the Velcro added to the chassis (as explained above).
Good points
• Takes three minutes to put on. Takes one minute to take off. Folds up to store easily behind a seat
• Shade!
• Keeps most rain off your face. Of course, there is seepage through the top of the windscreen, but 90% is sent over your head when moving and onto your arm when stationary
• Stops passengers on the top deck of busses and coaches looking down at your bald spot at the traffic lights
• The air freshener seems much more effective now. Love that pine fresh smell.
Bad points
• Getting in and out of the car is even more fun. You must master the ‘underhand grab and swivel’ technique. Kills a whole new set of muscles that you didn’t know you had.
• I think the roof makes it hotter in the cabin given a lot of heat comes up from the footwell. It may be that that heat isn’t escaping through the ‘roof’ when stuck in traffic. Or it may be that I was tired and felt the heat more than usual.
Anyway – shade!
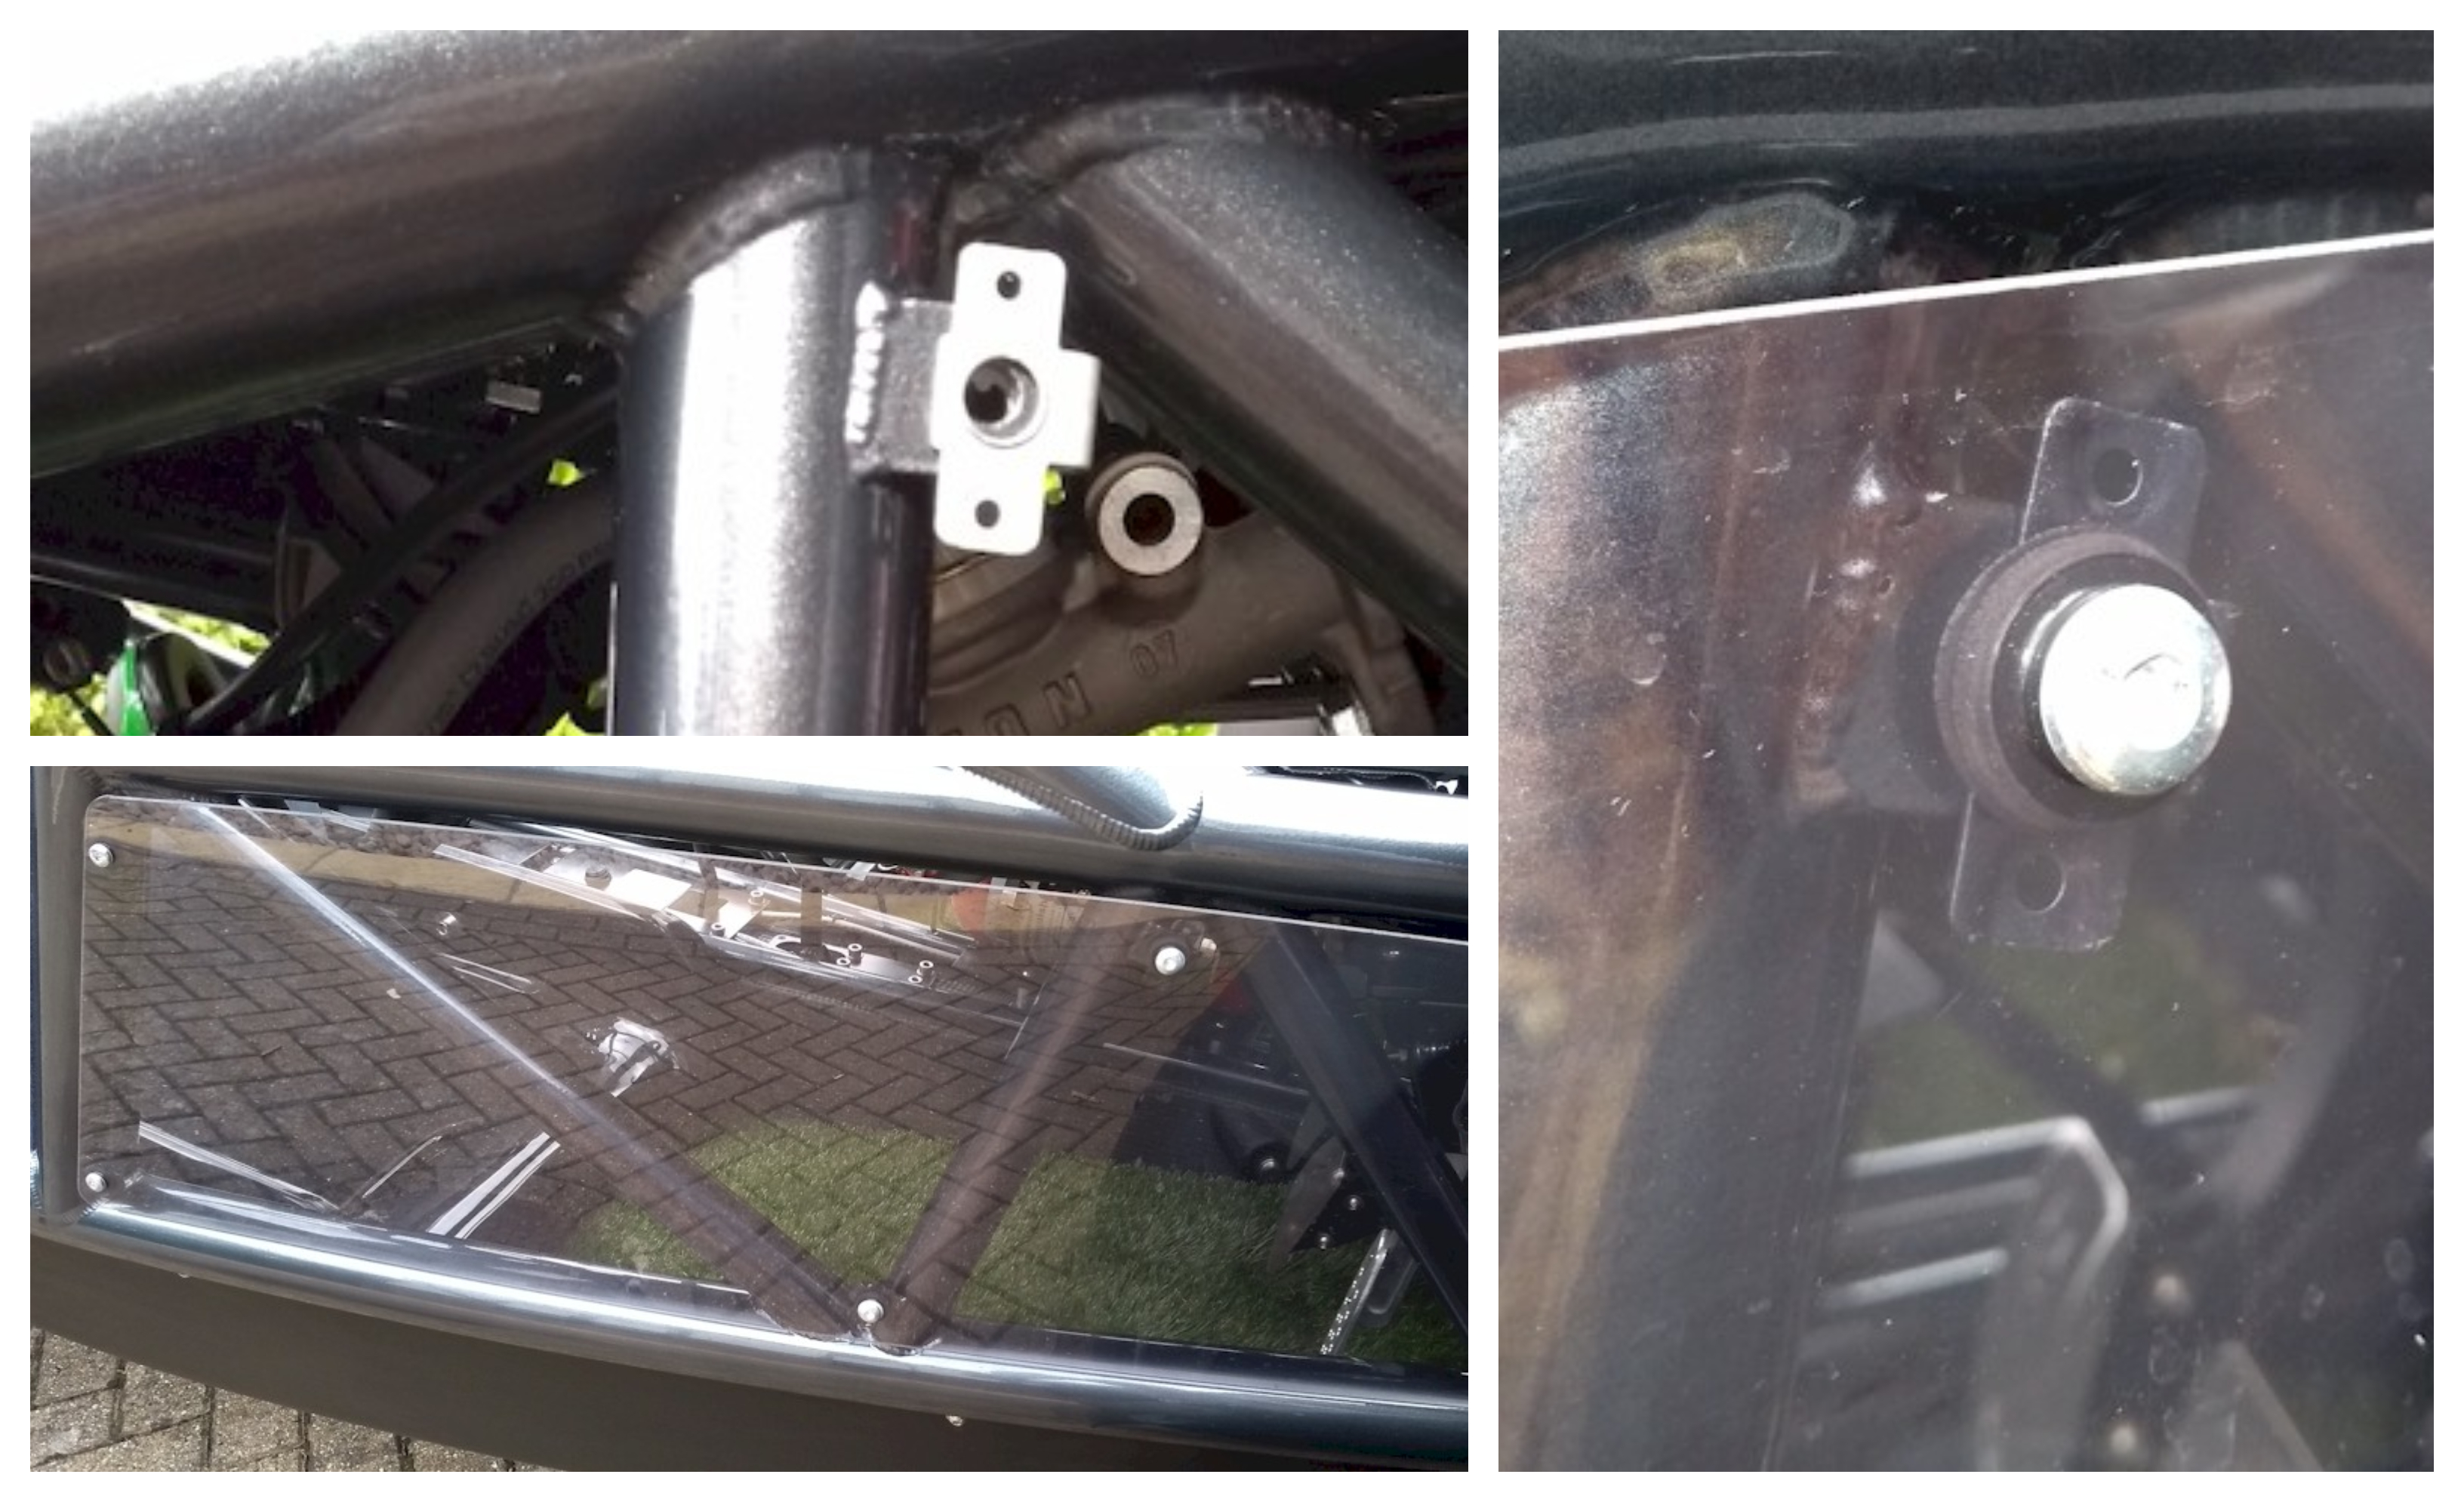
Fuse box protection
I wanted to find a way to stop mud and dust from getting into the battery bay and fuse boxes. It’s not too bad when water is coming straight down, but when going through puddles, muddy water has a habit of splashing up from underneath and working its way into the battery box.
I wanted something water resistant and, being near the radiator, it had to withstand a bit of heat. And of course, it had to be both secure for motorway speeds and easily removable.
Using some of the leftover heavy duty material from the roof project above, I used a couple of the existing bolts on the left hand side of the battery box as fixtures. After drilling a couple of small holes, I used Dzus fasteners on the right-hand side so that I can secure or remove the material easily. A strip of Velcro in the middle keeps it nice and tight and prevents flappage.
I had to take the front fairing off to secure it all in place, but it’s easy enough to open or close with the bodywork on to get to the battery box if needed.
So far, it’s done exactly what I wanted in keeping crud out of the electricals. The mess on the material is testament to what has not gotten inside of the battery bay.

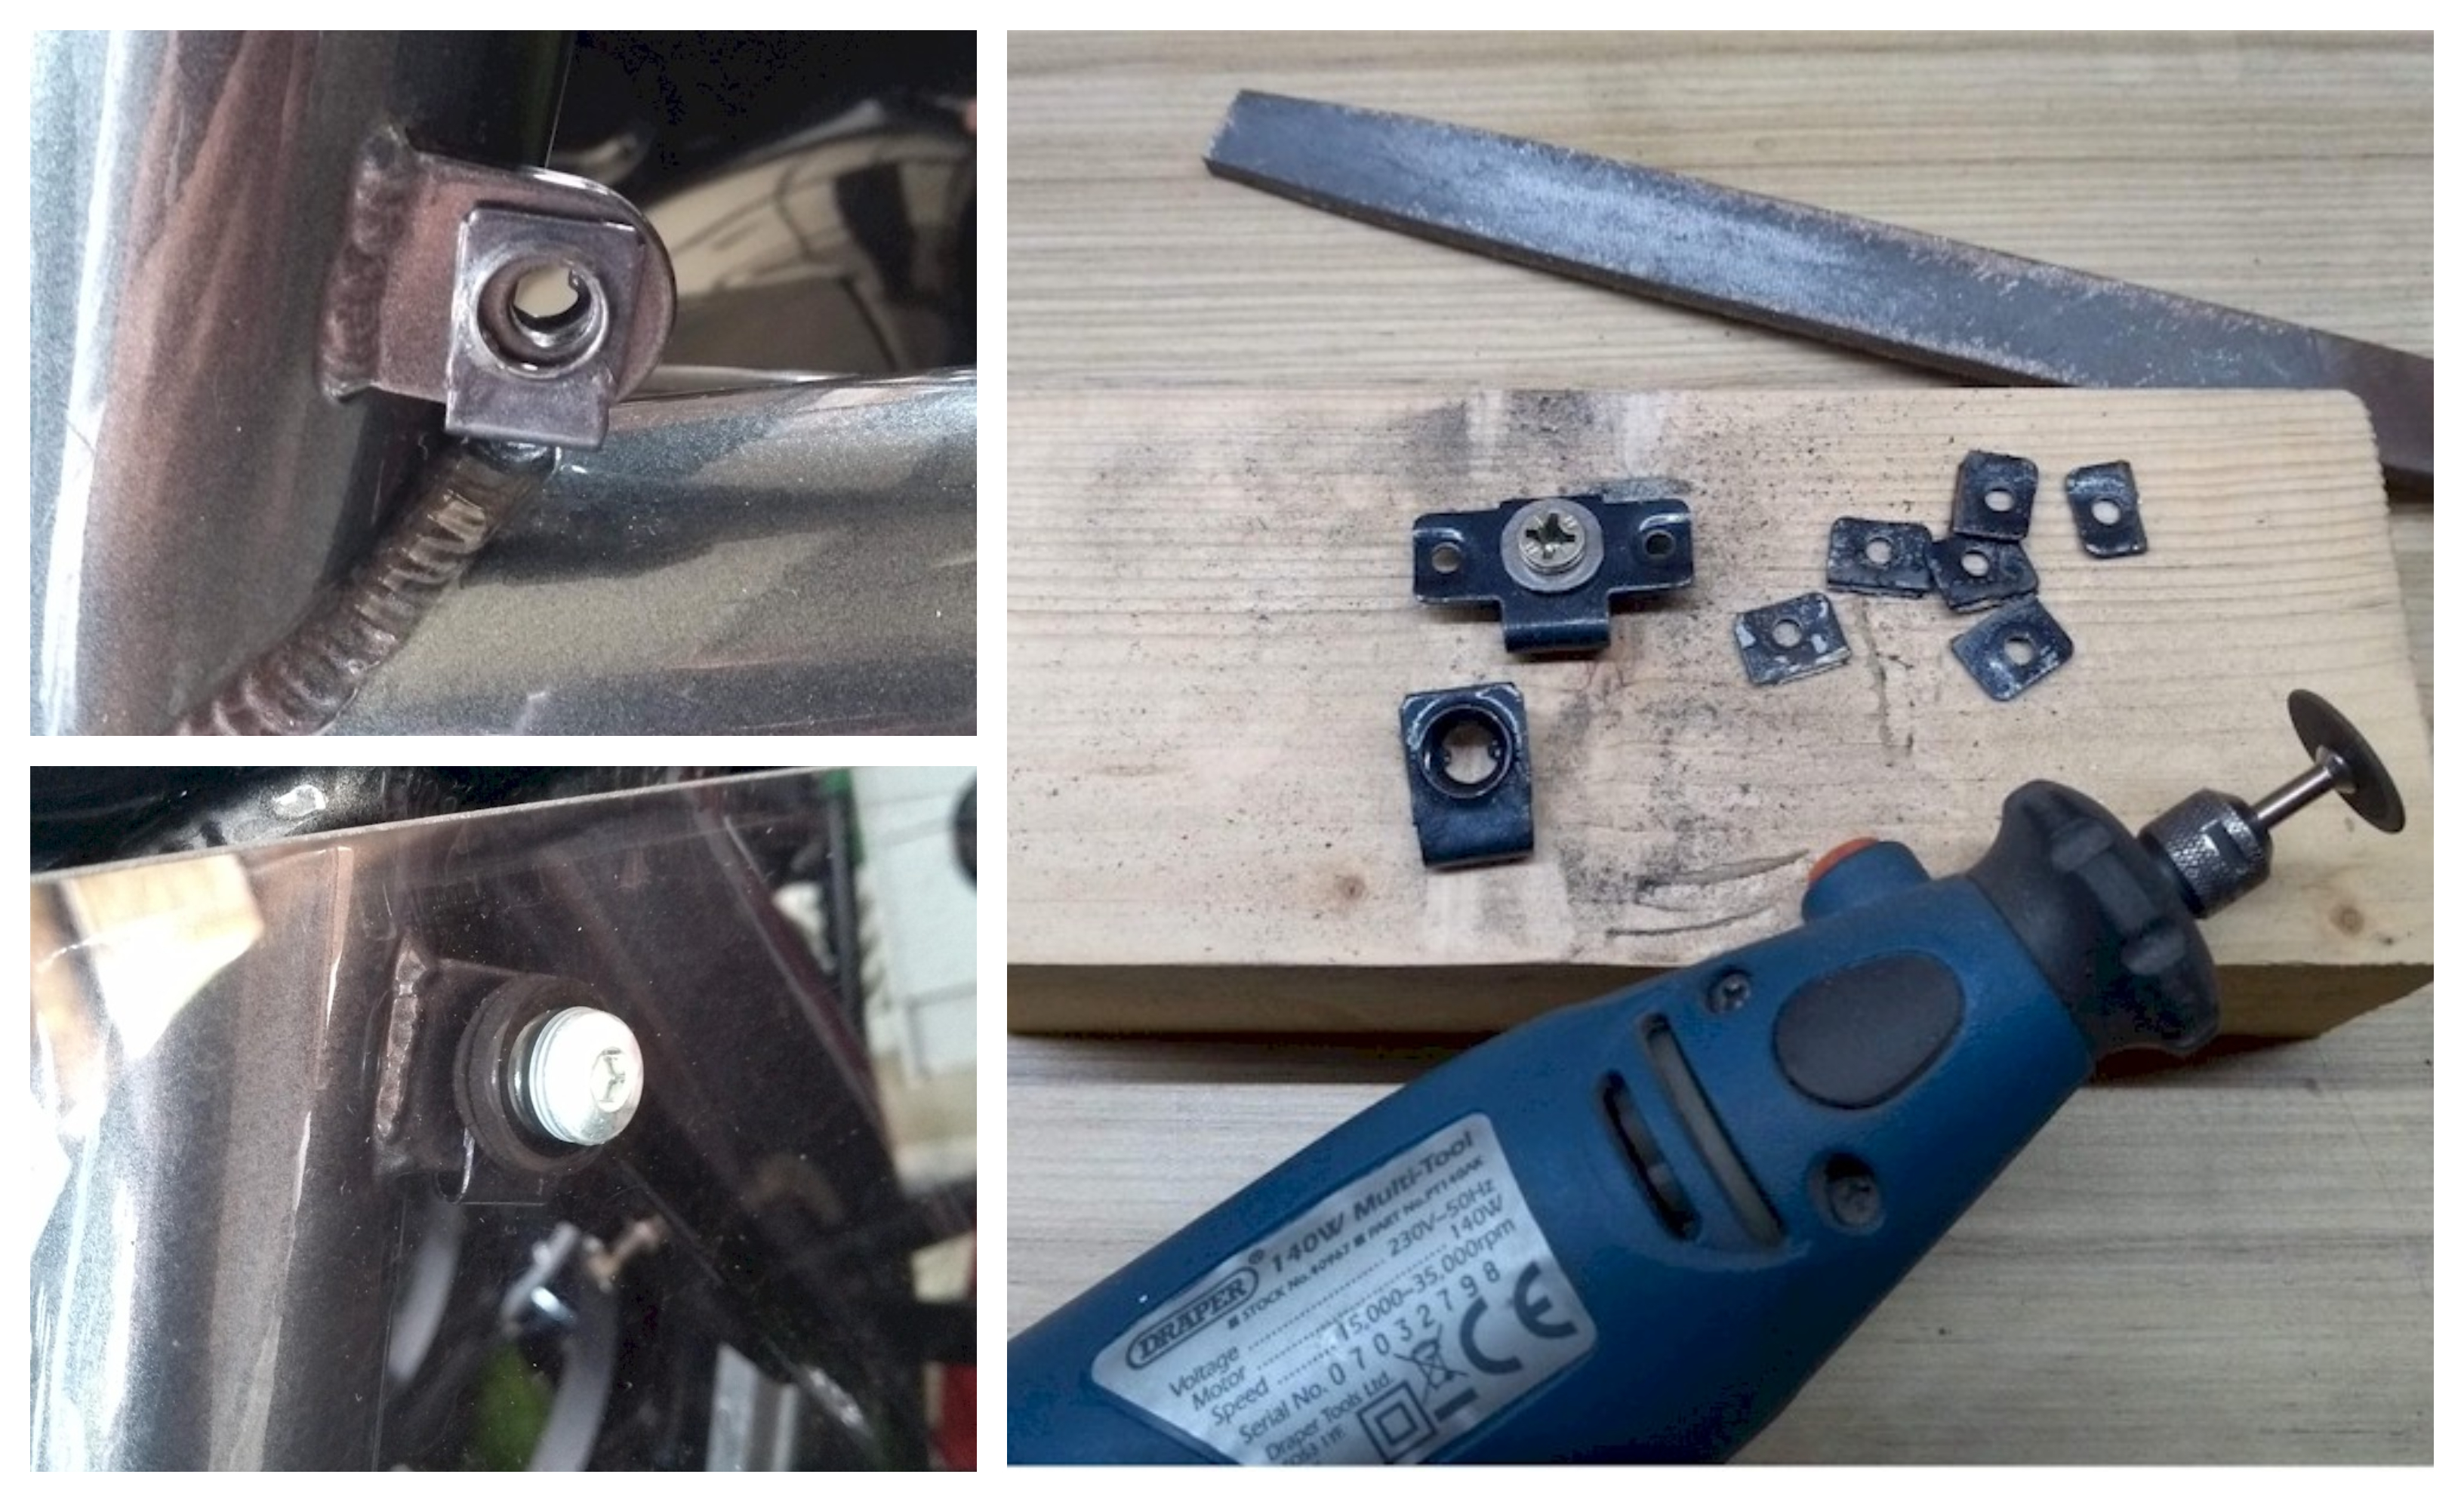
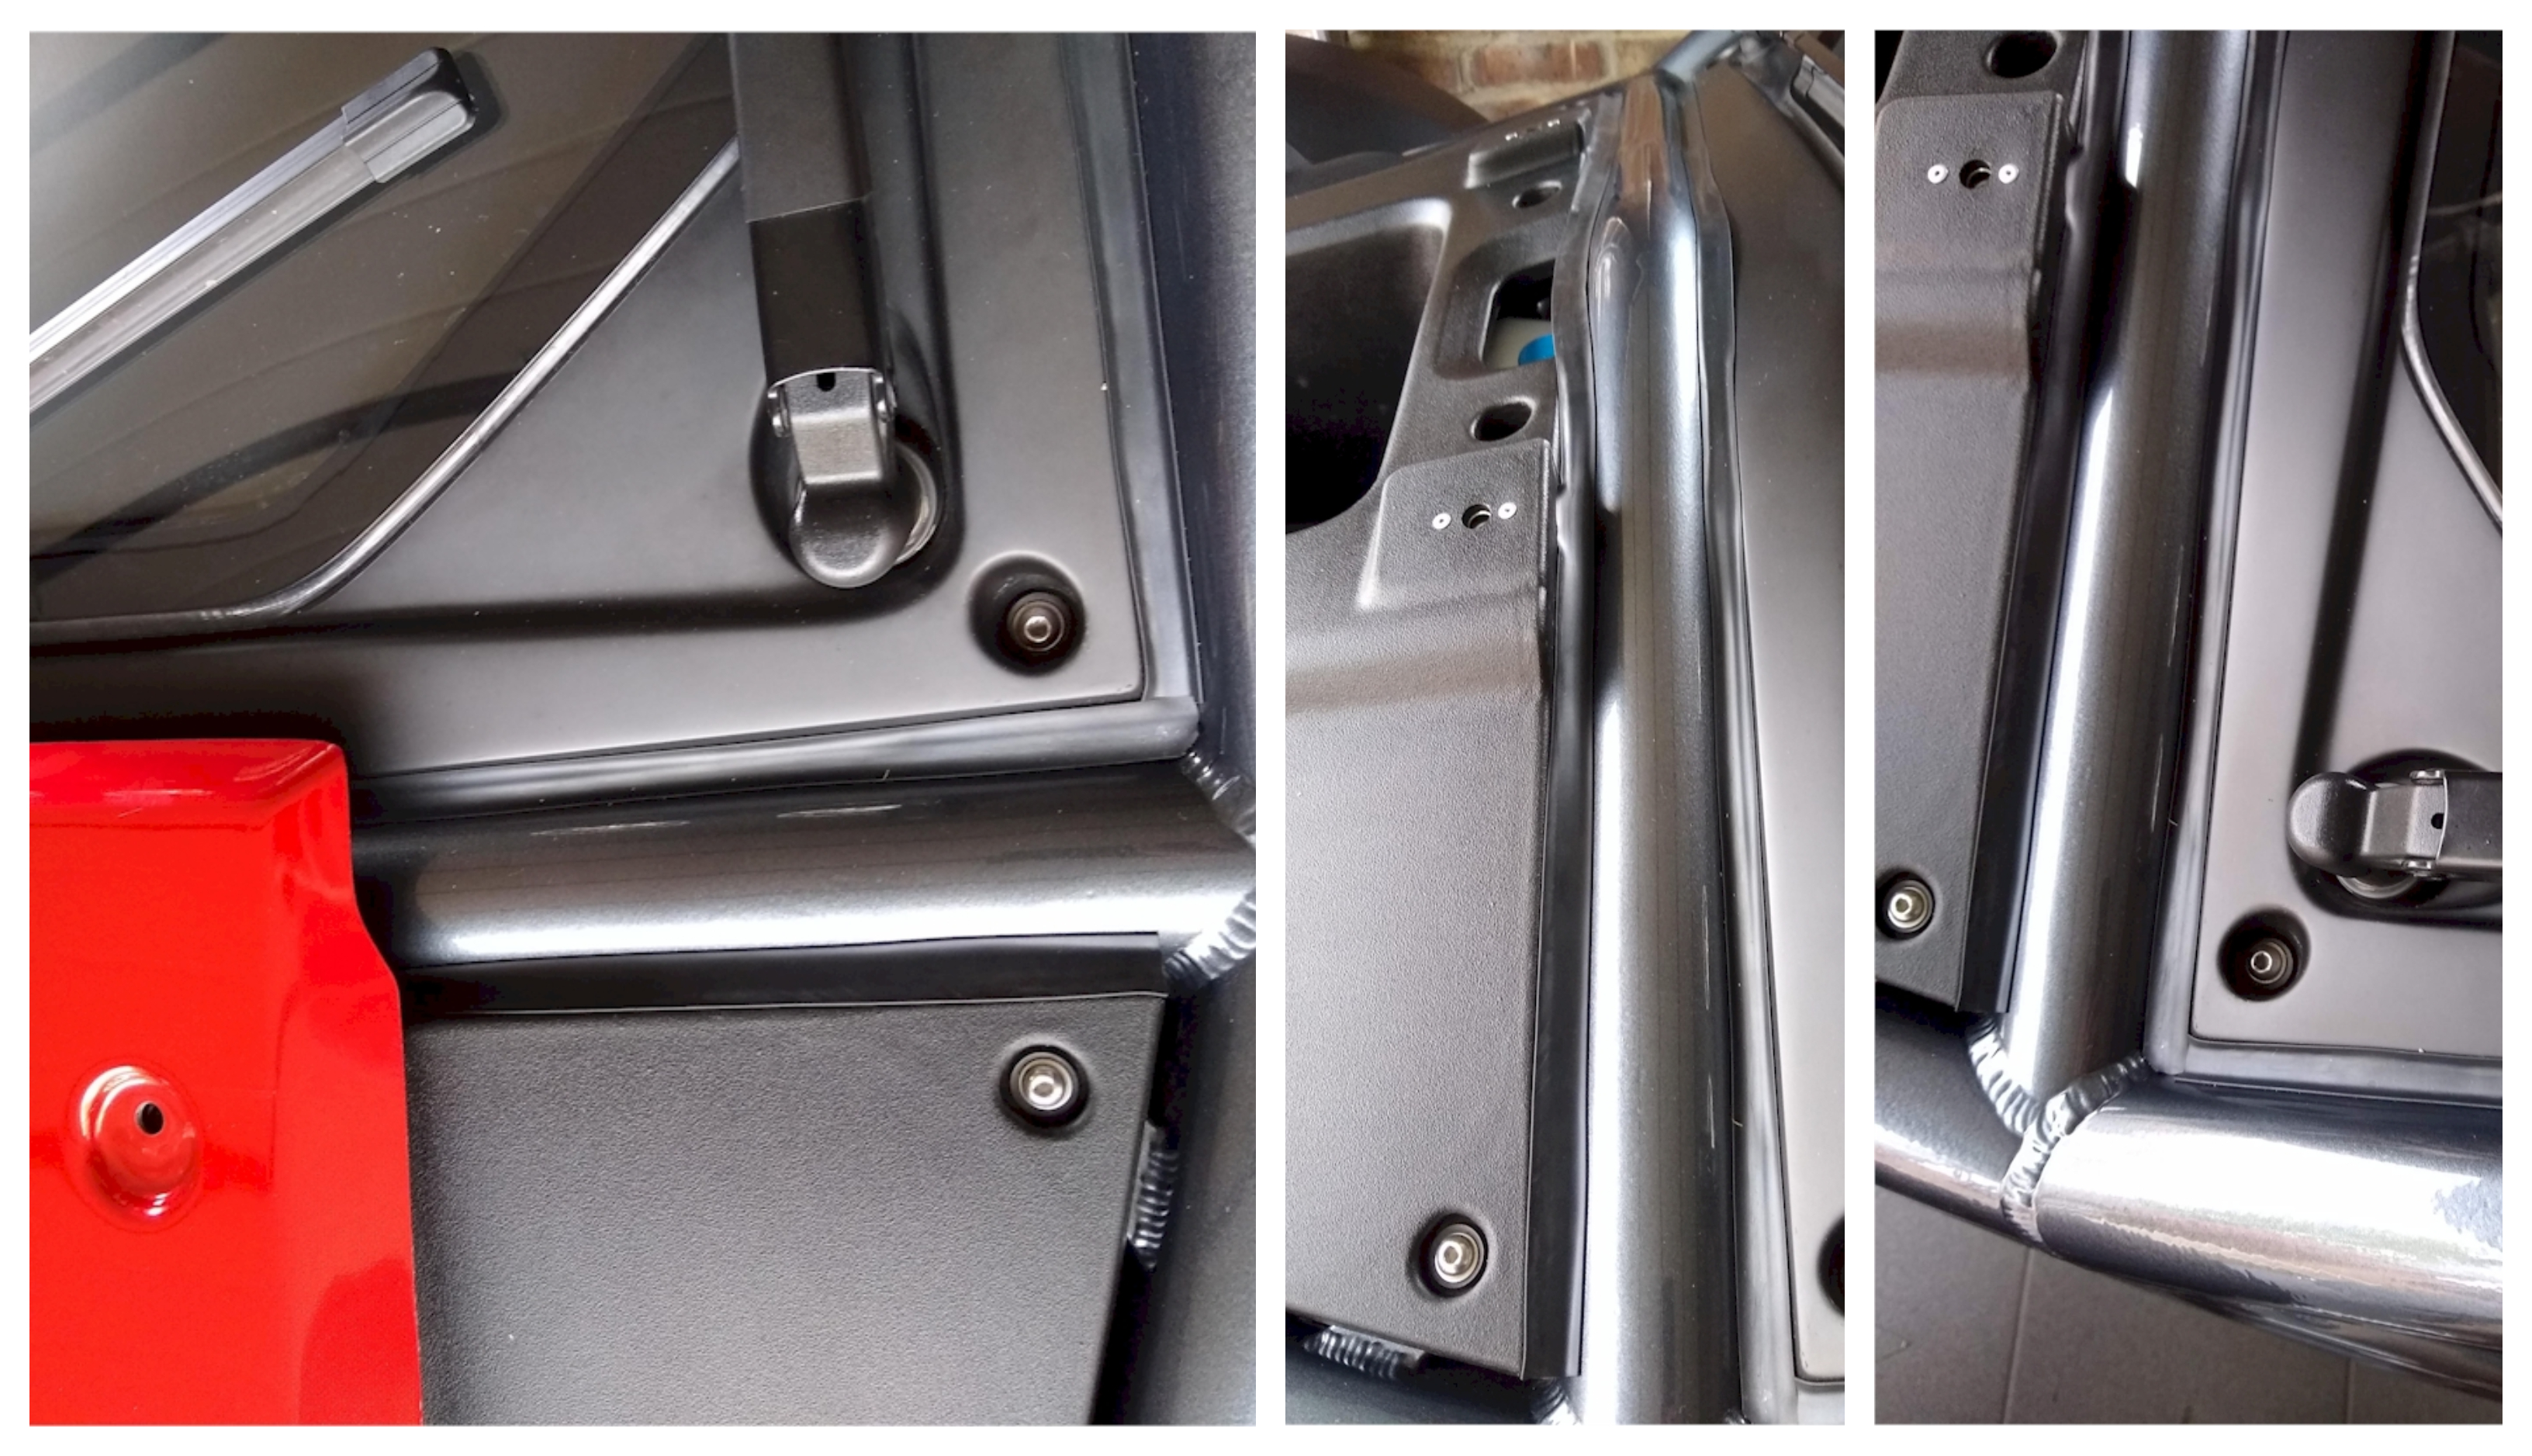
Quick release side panels
It is well-documented that the side panels do an amazing job of keeping most of the cold wind and rain from entering the side of the cabin. That said, on a hot day sitting on a plastic seat, the panels do an equally good job of making your pants sweaty. And of course, there will be times when the panels need to come off for that ‘deep clean’.
With a bit of practice, I now have panel removal down to about five minutes per side with about 10 minutes per side to put them back on again. And all without the help of a small child with impossibly skinny and freakishly long arms.
Like the bonnet and engine cover, I turned at Dzus clips (1/4 turn clips) as an option. I settled for 17mm bolt lengths for the four corners (per panel) and 19mm for the two centre fixings (per panel). I went for the button (Allen key) option to be as in-keeping with factory design as possible.
I used ‘rivet-on’ receptacles hooked over the panel lugs and sprayed them to a close enough colour match as a first run of the idea.
The panels now come off or go back on in around 60 seconds flat per side. I now even carry a 10mm hex key with me in case I need an emergency panel removal operation, but of course, that has never happened. So next was to ‘blend them in’ a bit more courtesy of a mini grinder and file. Plus more paint.
A bit of waterproofing
Let’s be clear: you can’t waterproof these cars. You just can’t. It is as open as a bike with four wheels and as any biker will tell you – you are better off waterproofing yourself. Except I really didn’t fancy wearing biker boots for those little pedals. And guess what? Most of the uncomfortable water leakage is aimed right at the feet. There is a gap between screen, frame and front bodywork. When you brake, water runs down the screen onto your feet. When you accelerate, water runs up the front bonnet onto your feet. And I don’t know about you, but I really don’t like soggy socks. After experimenting with wrapping this ‘problem area’ with waterproof material:
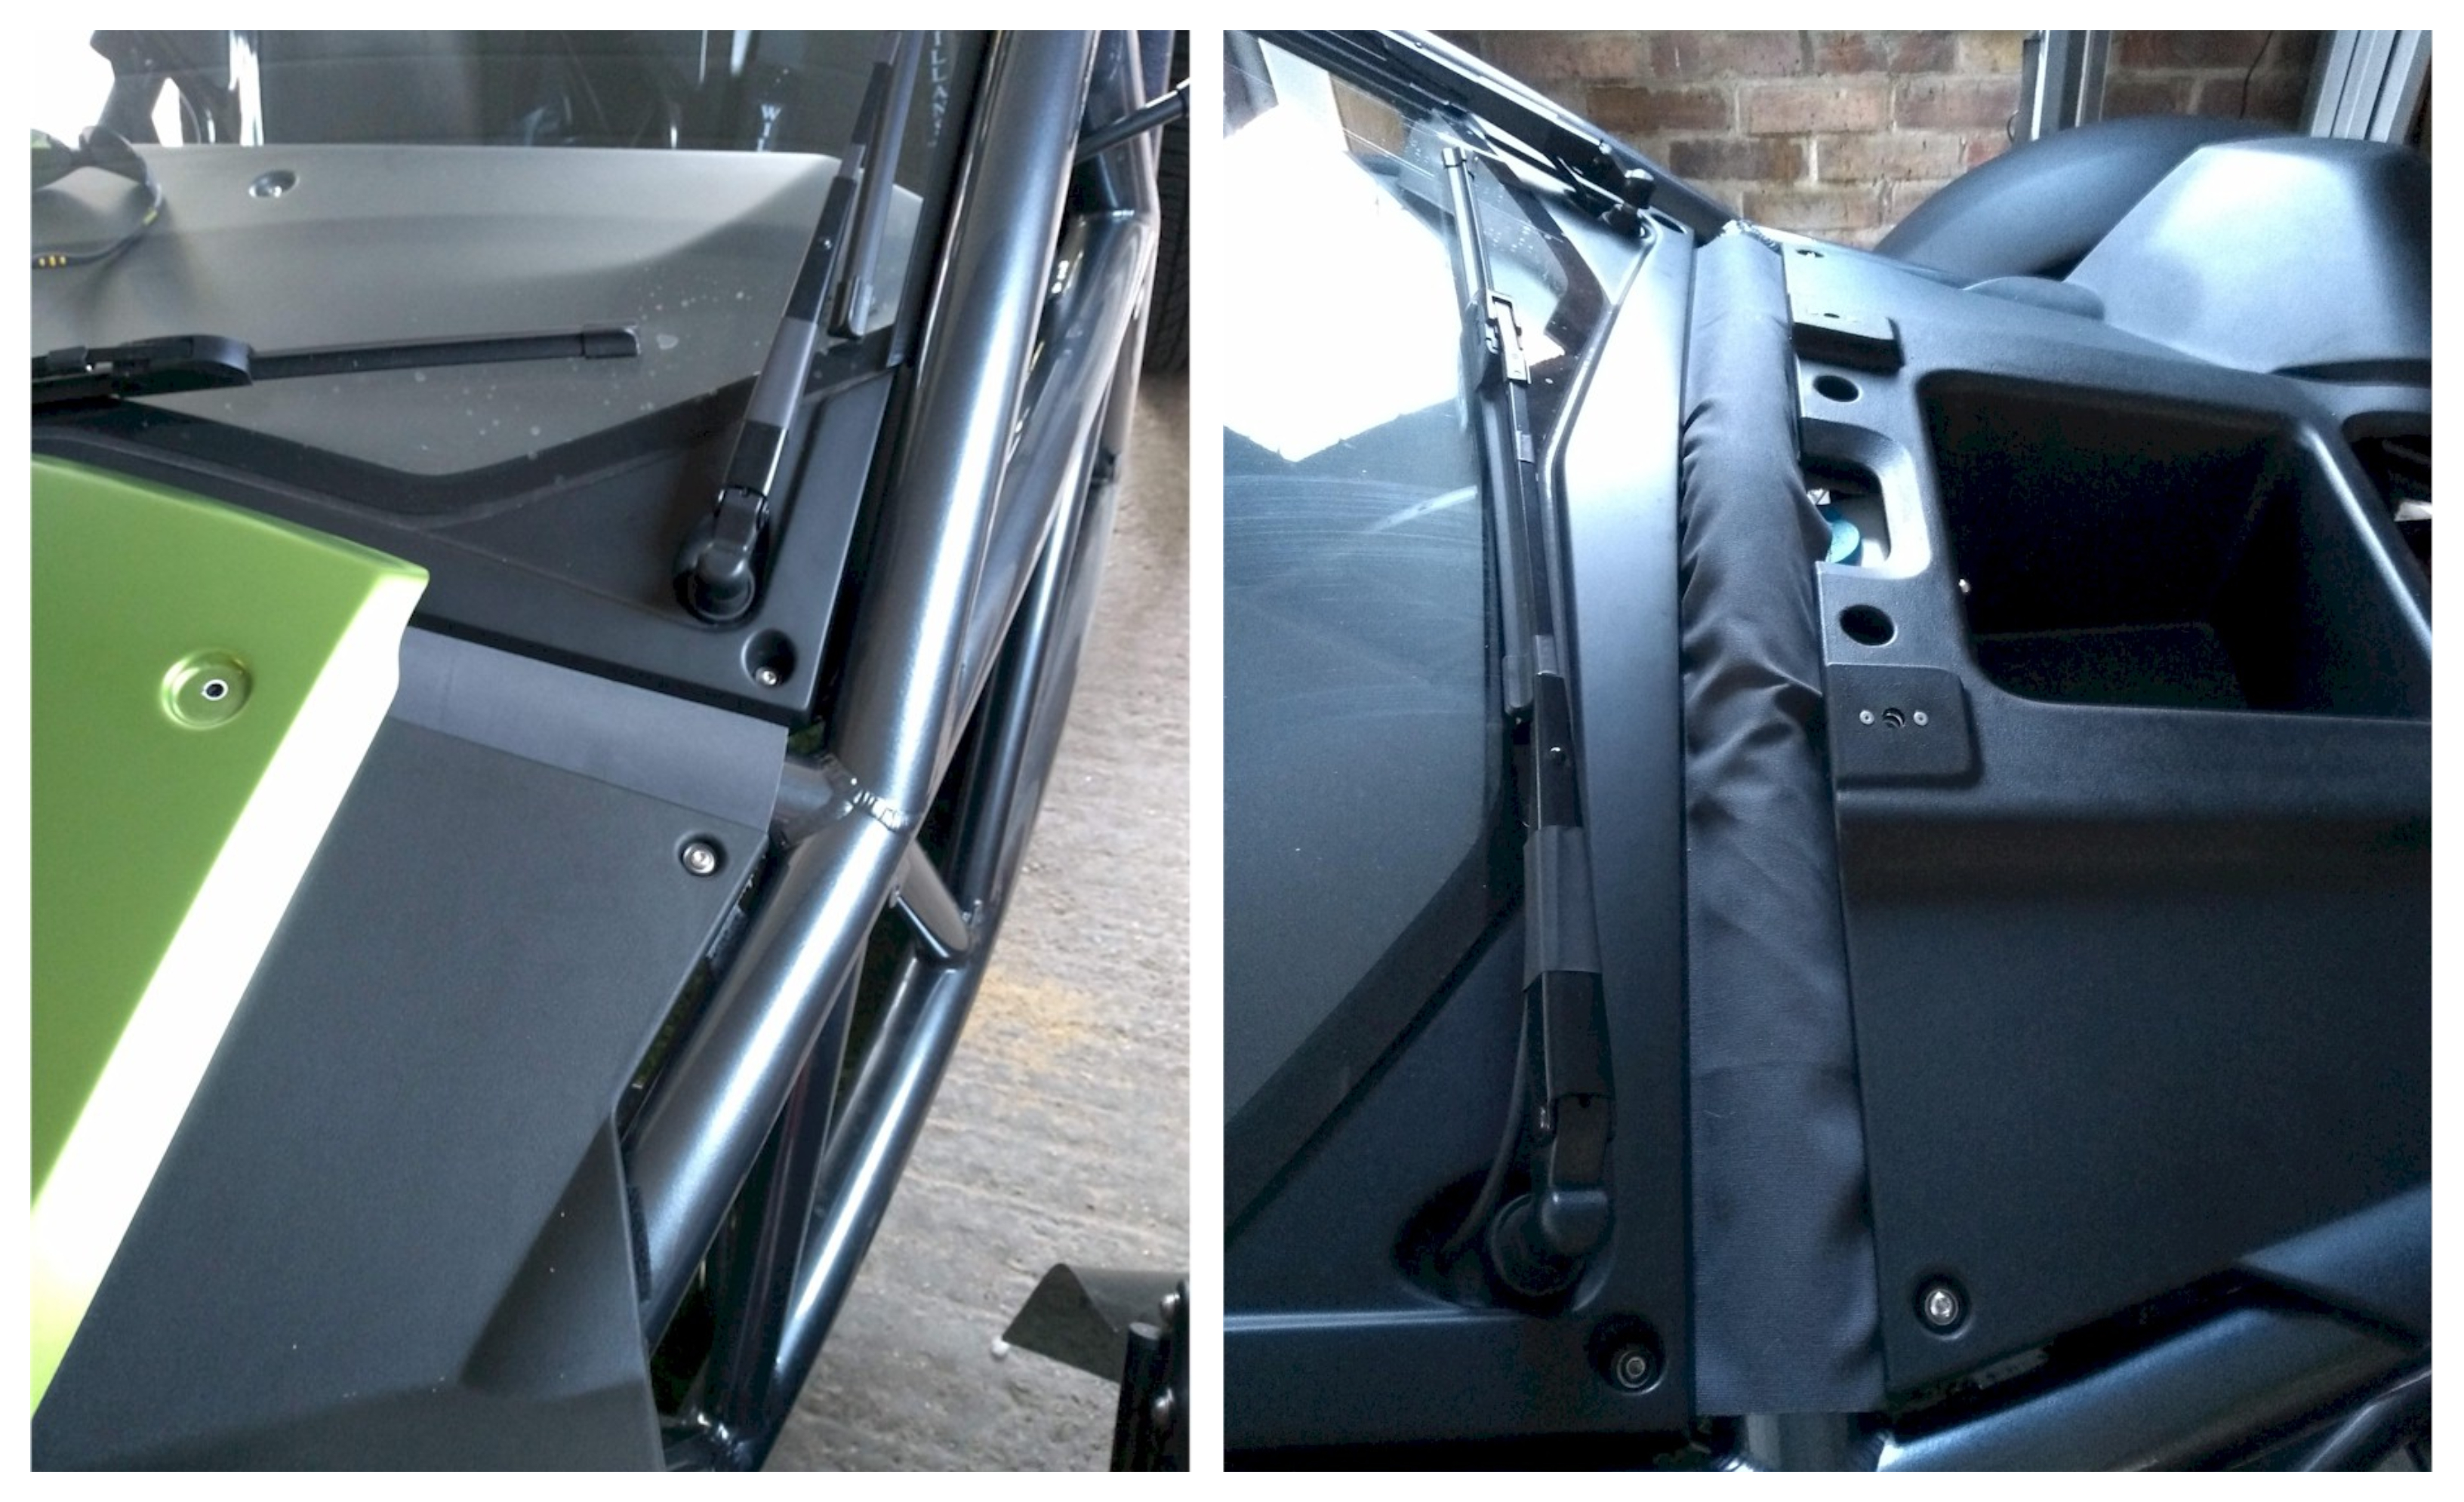
However, another club member pointed out a potential solution which has worked well so far: “1.6m soundproof, dustproof, U-type rubber edges sealing strip, noise insulation for auto car dashboard windshield.”
The strips sit quite snugly and I’ve taken the opportunity to also plug the small gap on the sides of the windscreen.
And just for fun…
I’d been trying to figure out if I could get the high-level brake level integrated into the NOMAD cut-out in the exhaust guard (stock photo):
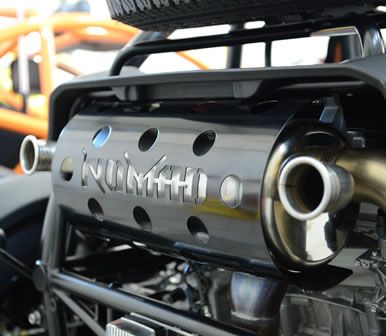
There’s not much of a gap between the rear box and the guard to house wires and flexible LED lights etc, as well as the issue with the heat from the exhaust pipe. So instead, I adopted a low-tech approach.
Using red reflective tape, I stencilled and cut out the NOMAD shape, cutting out extra ‘holes’ to make sure it tapes down nice and tightly, with a few layers of aluminium tape to build up a heat resistance layer.

Not quite high tech, but a bit more pronounced, be it during the day or night.
More details and other projects can be found on the forum
